DevStack
Transform your VSCode into a productivity powerhouse. DevStack consolidates 81+ essential development tools into one seamless extension, delivering everything you need without the bloat.
Core Features
Virtual File System & Navigation
- ✓Unlimited quick access - Pin any number of files, folders, URLs, and commands
- ✓Smart organization - Custom folders, subfolders, and batch operations
- ✓Instant access - One-click navigation to your most-used resources
Workflow Automation
- ✓Chain Execution - Sequence commands for complex workflows (git add → commit → push)
- ✓Smart Formatters - Live preview code formatting with detailed explanations
- ✓Batch Operations - Rename multiple files, remove unused imports, clean up code
- ✓Instant access - One-click navigation to your most-used resources
Development Tools
- ✓Snippet Manager - Create, edit, and organize code snippets with live preview
- ✓Theme Builder - Real-time theme customization with granular controls
- ✓Command Palette Pro - Quick access to VSCode commands with search
- ✓Markdown Editor - Built-in renderer with comprehensive cheat sheet
Project Management
- ✓Remix Integration - Route management, testing, and conventions
- ✓ShadCN Components - One-click component installation
- ✓GitHub Sync - Automated version control workflows
- ✓Extension Management - Development lifecycle automation
Productivity Enhancers
- ✓Clipboard History - Access your last 20 clipboard items
- ✓Bookmarks - Quick line-specific bookmarks
- ✓Unused Code Finder - Identify and clean up unused functions
- ✓Search Enhancement - Advanced project-wide search capabilities
Productivity Enhancers
- ✓Clipboard History - Access your last 20 clipboard items
- ✓Bookmarks - Quick line-specific bookmarks
- ✓Unused Code Finder - Identify and clean up unused functions
- ✓ Search Enhancement - Advanced project-wide search capabilities
🎯 Why DevStack?
- ✓Replaces 50+ extensions - Everything you need in one package
- ✓Zero performance impact - Lightweight with no background processes
- ✓Project-agnostic - Global and workspace-specific configurations
- ✓Constantly evolving - Regular updates with new features
🔧 Perfect For
- ✓Full-stack developers managing complex projects
- ✓Teams sharing consistent development environments
- ✓Productivity enthusiasts who want streamlined workflows
- ✓Extension minimalists seeking comprehensive functionality
File Configurations
- ✓Examples can be found in the configation section near the end of the readme
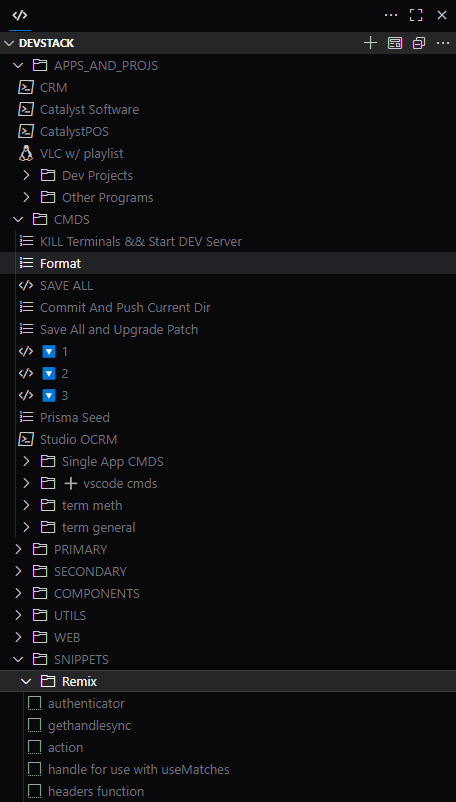
Overview
Virtual Filing System
A comprehensive organization system that removes the need for multiple extensions while providing efficiency in whatever context you're coding.
A virtual filling system that is displayed in a explorer pane where you can virtually add anything you want including but not limited to:
- ✓file
- ✓folder
- ✓URL
- ✓VSCode Command
- ✓PowerShell Command
- ✓Bash Command
- ✓Markdown (.md)
- ✓Snippet
- ✓Chain Commands
- ✓Concurrent commands
Files
- ✓Quick access to your most-used files.
- ✓Add files to custom folders and subfolders.
- ✓Edit display labels for files.
- ✓Remove files from the navigation pane.
- ✓Copy file paths with a single click.
- ✓Reveal files in your system’s file explorer.
- ✓Add multiple files to the quick access pane at once.
Folders
- ✓Create new categories.
- ✓Rename existing categories.
- ✓Reorder categories (move up or down).
- ✓Delete categories when no longer needed.
- ✓Use subfolders for better organization.
- ✓Right-click and drag to move items.
- ✓Move items up or down one position.
- ✓Edit labels of both global and workspace folders.
- ✓NEW — Create or delete global or workspace folders.
- ✓Toggle global state; this is optional for each config object.
URLs & Commands
- ✓Access URLs directly from the navigation panel.
- ✓Integration with VSCode commands.
- ✓Support for PowerShell commands.
- ✓Execution of Bash commands.
- ✓Open applications via terminal commands.
- ✓Manage Markdown files.
- ✓Organize code snippets.
Features
- ✓Despite it looking complex a simple and effective UI that keeps you away from the config file
- ✓- Easily create, edit, and move folders and their items
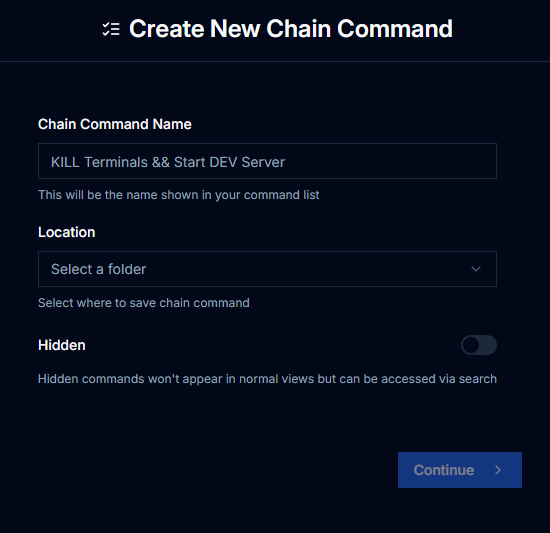
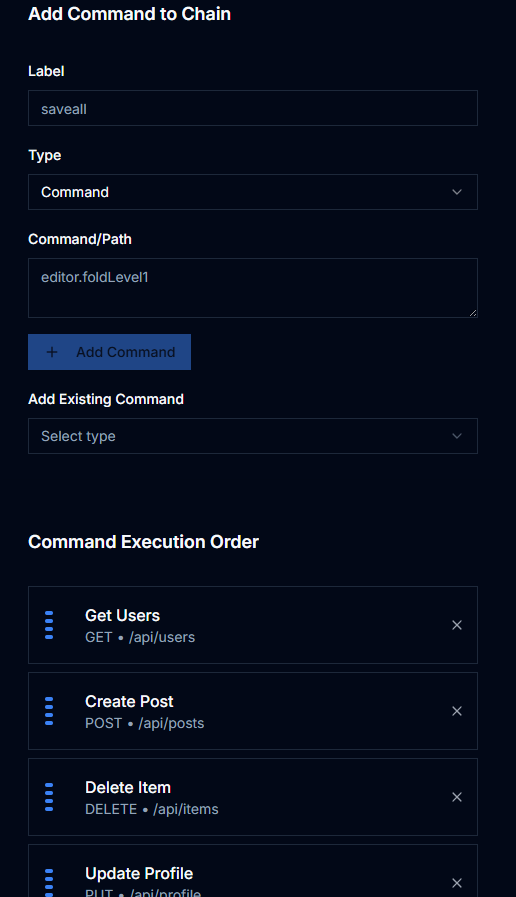
- ✓- For creating chains, the command input and title are displayed at the top, along with a folder selector showing your config folders to choose the chain command’s location. Other parent chain command fields are locked.
- ✓Below that is a form to add new commands with label, path (command), and type. Adding commands updates the parent chain automatically.
- ✓Commands are listed below for review.
- ✓A 'Continue' button appears at the bottom right when ready.
- ✓The next screen locks all fields except the execution list, allowing you to reorder commands as needed. Upon completion, the chain and parent commands are saved, hiding child commands to avoid UI clutter.
- ✓- Eliminates the need to manually edit the config for these tasks.
- ✓- In short, anything that can be done (or previously limited due to complexity or VSCode interface constraints) will now be available for execution through this UI.
Itemized list of features that can be found on the UI
- Sidebar Navigation and Command/Task Execution:
- - The sidebar contains three menus to choose from:
- - Navigation — browse pages within the new UI.
- - DevStack Commands — mirrors the VSCode UI; clicking a command runs it in your active workspace.
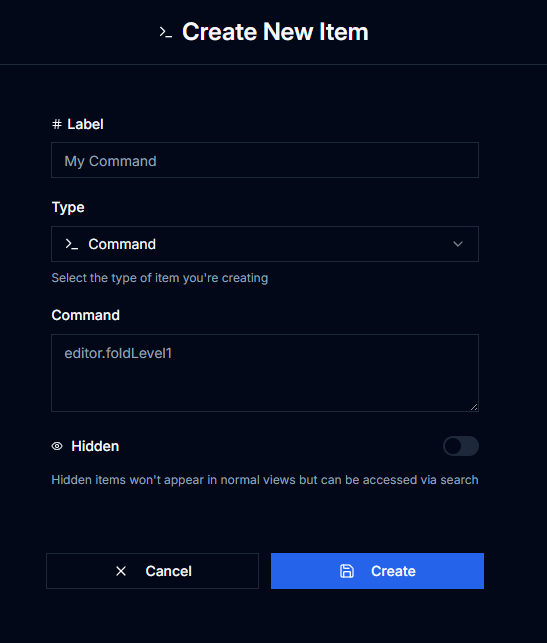
- DevStack:
- - Create, edit, and delete commands and items easily.
- - Create chain commands without opening the config file.
- ---
- Markdown Editor:
- - The old Markdown editor is still available if you prefer it.
- - New rich-text editor saves files to your global user folder, accessible across projects.
- - Sidebar includes:
- - Cheat Sheet — click any item to copy its formatting to your clipboard.
- - Outline — creates bookmarks for each heading for quick navigation.
- - Files — a UI file explorer for your Markdown files.
- - Renderer — toggle the live preview on or off.
- - Choose between inline or split preview modes.
- ---
- Color Wheel:
- - Full color palette.
- - Handy small features that enhance working with colors.
- ---
- Lucide Icons:
- - Clicking copies the React component to the clipboard.
- - Improved search with broader parameters across icon libraries.
- - Unified search results regardless of icon library naming differences.
- - Not fully complete across all libraries yet, but the goal is full coverage.
- ---
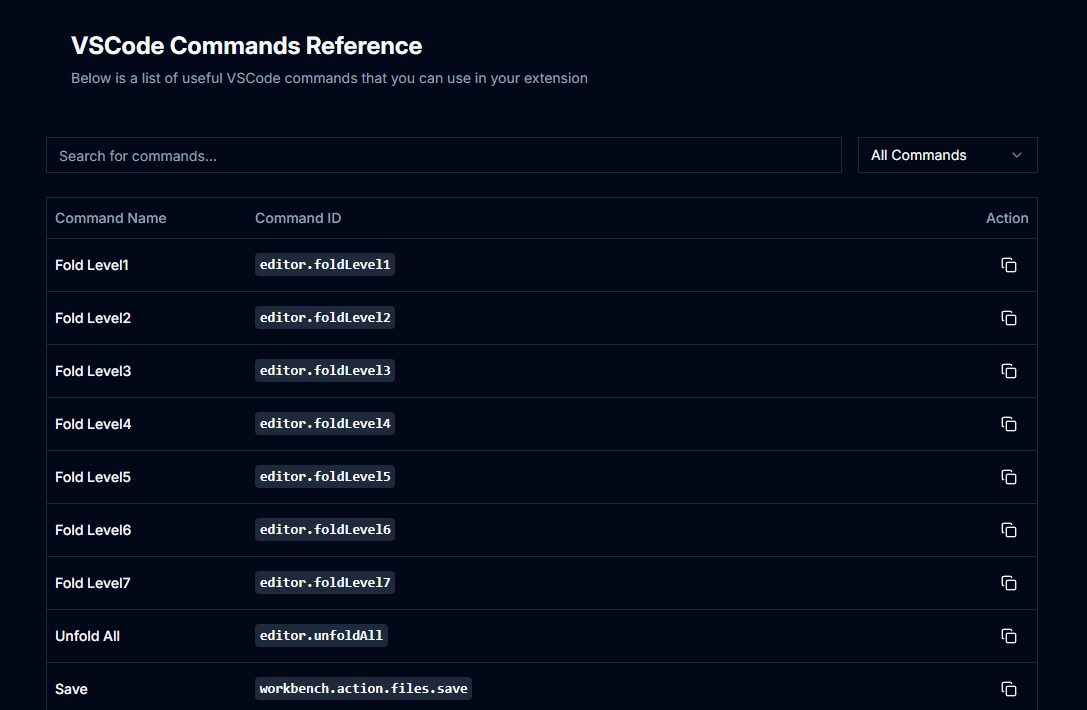
- VSCode Commands Reference:
- - Includes about 450 of the most commonly used VSCode commands (out of ~3500 total).
- - Searchable with dropdowns to browse by category.
- - Fuse.js enabled for fuzzy searching.
- ---
- Markdown Reference:
- - Includes all GitHub-flavored Markdown formatting supported by the GitHub renderer.
- ---
- Theme Builder:
- - Fully operational with default, manual, and custom options.
- - UI updates live as you adjust colors.
- - Extended features to:
- - Copy Tailwind config for use in any project.
- - Copy VSCode theme config to clipboard.
- - Save VSCode theme to your workspace’s `.vscode/settings.json`
- - Save VSCode theme globally, without overwriting local workspace themes.
- - Overall, the theme builder turned out better than expected, making theme configurations and saving very easy while taking up no where near as much time to build
- ---
- Formatter:
- - Live preview updates instantly as you change any formatting option.
- - Viewer is sticky, so you can scroll through options without losing sight of changes.
- - 33 of 72 planned formatters included so far.
- - Working towards full coverage to avoid needing external extensions or leaving files unformatted.
- ---
- Default Apps / Functions:
- - Allows detailed explanations of each item beyond what’s in extension settings.
- - Helps you understand what each toggle or setting does before changing it.
- ---
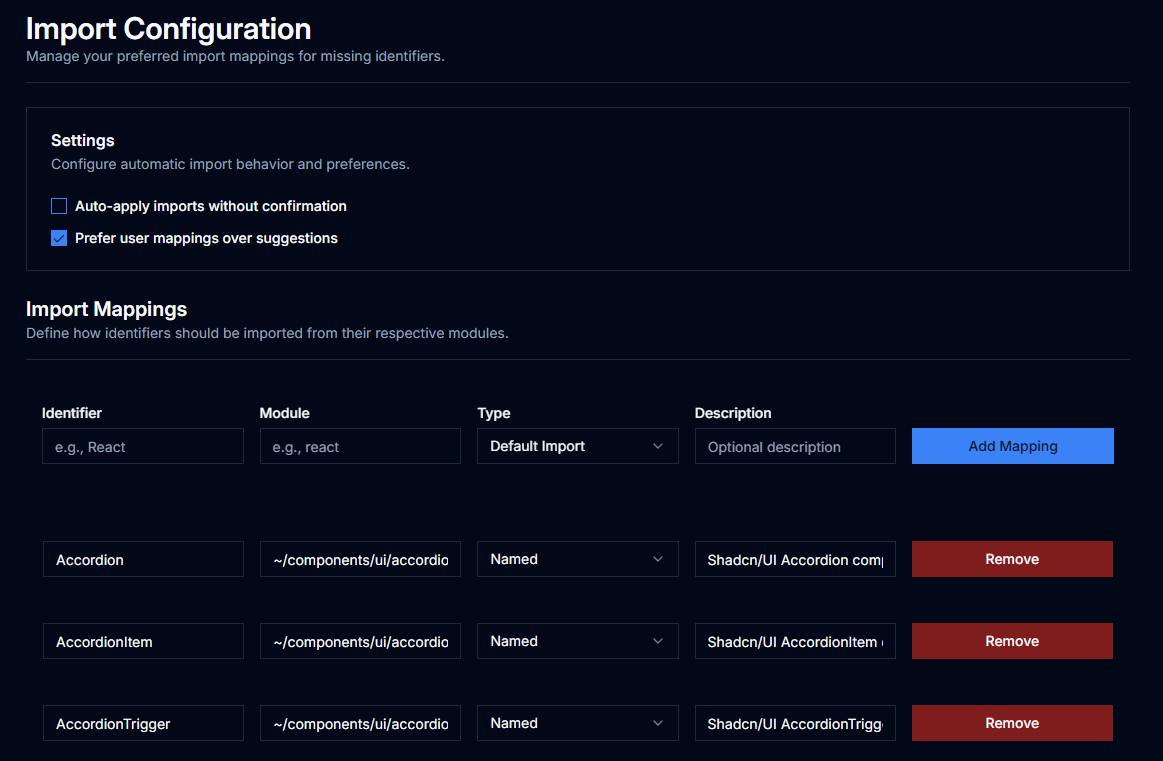
- Add Missing Imports Configurator:
- - Comes preconfigured with many popular libraries but you can add your own.
- - Included libraries:
- - lucide
- - shadCN components
- - remix-run/node
- - remix-run/react
- - remix-utils
- - react
- - MSAL React
- - Microsoft Graph Client
- - TanStack React Table
- - TanStack Match Sorter Utils
- - date-fns
- - fuse.js
- - papaparse
- - resend
- - stripe
- - crypto
- - @twilio/conversations
- - sonner
- - react-signature-canvas
- - @react-pdf/renderer
- - pdf-lib
- - lodash, acious, clsx, dayjs, prisma, vscode, fs, path
- ---
- Create Monorepo:
- - Sets up a monorepo project with shadcn components and STR installed.
- Create Single App:
- - Creates a project using `npx create-react-router@latest`, then sets up and configures STR for single-app use.
- Convert To Monorepo:
- - Converts a single app into a monorepo, installing shadcn components and STR.
- Build and Deploy Project:
- - TurboRepo-like experience with a UI instead of CLI/config files.
- - Preconfigured build options: quick deploy, standard build, production ready, full pipeline, and custom builds.
- - On load, updates project data before sending to configurator for up-to-date info.
- - Scans for current projects in the app folder.
- - Checks compatibility to prevent combining incompatible apps.
- STR - Init:
- - Creates STR config file in the current project.
- STR - Setup & Configure:
- - Sets up STR, choosing between monorepo or single app configuration.
- STR - Update Prisma Scripts:
- - Adds necessary Prisma scripts to `package.json` for build and deploy functionality.
- - See task runner section for more details.
- And for anyone worried about performance: I currently have 15 tabs open, music playing, 3 workspaces open, 2 dev servers running, SQL databases active, Riot client open, sometimes gaming—all without issues or needing to close anything.
NOTE
A VSCode workspace is required in order to interact with most of the web ui, any function that needs data from vscode / config file data, will not work if it doesn't have access to a workspace.
Pages like lucide icons, color wheel, md reference sheet, vscode cmds reference, exmaple configs and the theme builder will still work if no workspace is open
Filing system is virtual; when a file is created, moved, or edited within the extension, the original file (if any) remains unchanged. The configuration is stored in a JSON file that tracks the 'filing system'.
Folders support only two levels of depth. Going deeper was deemed unnecessary and defeats the purpose. However, hidden items can be toggled visible or hidden, allowing a practical depth of three levels.
Markdown files are created inside the `.vscode` folder for storage and can be organized freely within the navigator for access.
Usage - VSCode UI
Video of UI dashboard will be placed at the end of this section.
Add to CRM Navigator
- -Add the current file to the navigator via right-click in the item explorer.
- -Use the dropdown menu under the 'Add Items' submenu.
Edit Label
- -Right-click item in navigator
Remove File
- -right click item and select delete
Copy Path
- -in the vscode panel, right click the item
Reveal in Explorer
- -in the vscode panel, right click the item
Quickpic menu located on the bottom status bar on the left named DevStack
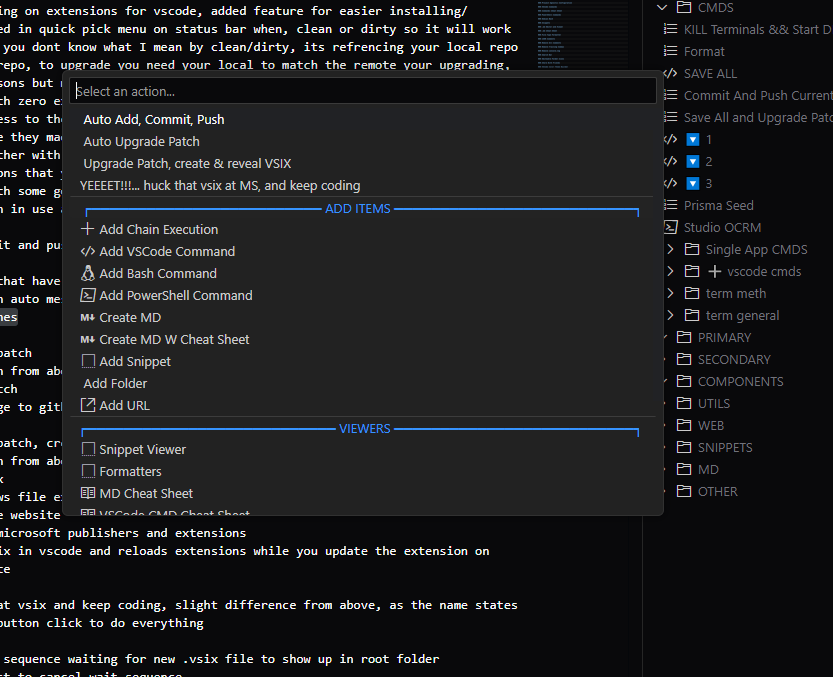
- -Auto-add, commit, and push changes.
- -Auto-upgrade patch and push the repo.
- -Push repo, upgrade patch, create/install/reveal VSIX in Windows file system, open default browser, and navigate to Microsoft’s dashboard for manual VSIX upload (for VSCode extension development). Useful for a hard VSCode reset.
- -‘Yeet!’ — loops looking for new VSIX, pushes repo, upgrades patch, creates/installs/pushes new VSIX to marketplace, then soft-resets VSCode.
- -Add chain item.
- -Add VSCode command.
- -Add Bash command.
- -Add PowerShell command.
- -Create Markdown file.
- -Create Markdown file with cheat sheet open side-by-side.
- -Add snippet.
- -Add folder.
- -Add URL.
- -Open snippet viewer.
- -Open formatters.
- -Open Markdown cheat sheet.
- -Open VSCode cheat sheet.
- -Open theme configurator.
- -Edit JSON config.
- -Share config with friends.
- -Edit default settings.
- -Refresh.
Import / Export
- -On the extensions title bar
- -Under configuration
- -There are several options to choose from when it comes to handling the config file
- -Giving you complete granular control, if you wanted it
- -Exporting the config, creates a file in the root of your workspace
Configuration Files
- -File exmaple in configuration section
- -ID file: .vscodeocrmnavigatorid.txt
- -Global config file: AppData/Roaming/Code - Insiders/User/globalStorage/skyler.ocrmnav/global-navigator-config.json
- -Workspace config file: AppData/Roaming/Code - Insiders/User/globalStorage/skyler.ocrmnav/project-configs/project-{uniqueID}.json
- -Global snippet file: AppData/Roaming/Code - Insiders/User/globalStorage/skyler.ocrmnav/ocrmnavigator.code-snippets
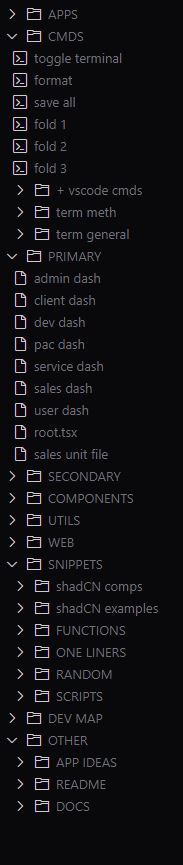
- -Global folders - APPS_AND_PROJS, CMDS, WEB, SNIPPETS, MD, OTHER
- -Workspace folders - PRIMARY, SECONDARY, UTILS, COMPONENTS
Commands
Empowering you with quick access commands where you can preset any flags you want, saving you from constantly referring to the documentation.
Features
- ✓for adding, editing, and managing items or commands
- ✓use the viewer’s dropdown menu or the navigation if the viewer is already open and running
- ✓in the create submenu
- ✓select any the cmd option
PowerShell and Debian Bash Commands
This feature does not use the usual bash command execution.
Features
- ✓Instead of just running a single command in the vscode folder, this opens a new terminal and executing it in the wsl debian instance
- ✓for adding, editing, and managing items or commands
- ✓use the viewer’s dropdown menu or the navigation if the viewer is already open and running
- ✓in the create submenu
- ✓select any the cmd option
- ✓Create any command with the runtime flags you need.
Commands Cheat Sheet
Features
- ✓Command reference sheet featuring 360 of the most commonly used commands.
- ✓Searchable by command or browsable by category.
Chain Execution
Chain execution lets you run VSCode commands, shell commands, PowerShell commands, and more. Makes even the most menial or complex repetitive tasks simple with one-click solutions.
Features
- ✓What if you want to chain 10–20 commands together and execute them with a single button press? Even if you want to push that to 50 commands, no problem—handle any project functionality you need. For the first time in VSCode, there’s no limit on quantity or length, so the only thing stopping you from creating powerful functionality is you.
- ✓Chain any commands listed in the config file.
- ✓Each command must have a unique name; for chained commands, use the hidden flag to keep them out of the nav.
- ✓Hidden commands let you build long sequences without cluttering your navigation.
- ✓Set command flags once and forget about them.
- ✓Control execution order to handle commands with prerequisites.
Usage
- -In the viewer’s submenu under 'Create', select 'Chain'.
- -If the viewer is already open, the navigation inside also lets you create chain commands.
- -Follow the on-screen instructions to complete the setup.
Running Commands Concurrently
Replacing STR, this gives you the ability to run commands concurrently like turbo repo or how str does, straight from devstack
Before moving str over and merging it, I did try to replicate its functionality in terms of multiple processes being piped through a single terminal, displaying all of its output when running concurrent tasks.
At the time I thought it couldn't be done from the vscode extension, after several attempts. There are ways to run tasks concurrently, very easily infact but almost all of them run them in the background with no way to add input of any kind thus not allowing you to cancel the running task/s among other things.
While I was taking a break from one of my clients projects, I started working on it again, didn't think it was gonna work but somehow I managed to get it working. I'm not going to get rid of str yet, I need to convert some more of its code before I do that... But theres no point in keeping it anymore as this was the last functionality that the extension was missing to fully replace it. So the command line aspect of str, will be fully removed. I'm probably not the only one in regards to this, when the ui was introduced I think I may have used the cli instead of the ui, once. Along with that the str ui pane, will also be removed. As there is no point to it anymore since the same functionality can be achived with the devstack pane. Since all the other functionality was already converted, it will be staying obviously, but will no longer have the STR abbreviation in its name.
Similar to chains, other than the fact instead of being called chain, its called concurrent. I also worked in the code that, concurrent can run ANY command / task available via devstack, just like chain does. So if you need to open a pdf while running a build script, so be it. Or if you want to add vs code commands to your concurrent tasks, this was something that str... could NOT do, due to only being able to run terminal commands. With running this from the extension, concurrent can now do anything that this extension has to offer.
This is a nice outcome as I find having that last bit of code from str being tacked on, adding uneeded complexity for new users.
There is one single drawback. The terminal will also display the command being executed, in terms of the text being displayed. This is something I could not find workaround on but the benefits out weigh the single drawback. Especially since that one terminal outputs so much text anyway.
With this update, I made another small change to the ui interface for creating commands. I found that, if I wanted to create another command similar to one that was already implemented, for example adding another project to a mono repo and wanted to create the same commands for the new project, I would have to open the config in order to reference them. Instead I placed a command with search capabilites on the creation screen where you can search through your commands already in the config file, thus saving you time of having to open it and dig through it.
Features
- ✓Concurrently run commands through a single terminal
- ✓Concurrent commands have one parent command, and as many child commands as you would like
- ✓Child commands can be hidden from view in ui with the the hidden: true flag
- ✓No limit on the amount of commands able to be executed
- ✓No limit on what type of commands you would like to run, for example:
- ✓- you can open files
- ✓- open urls
- ✓- run vs code commands
- ✓- can execute chain commands, weird I know but hear me out. If you wanted to run a set of commands that needed to be ran sequentially instead of concurrently, during your concurrent command execution... now you can
- ✓- bash commands
- ✓So just like the chain command you have access to run anything you want
- ✓Below you will find an example config, just in case the ui for creating them isnt working
- ✓Personally, I'm happy how this turned out because it not only opens up what you can do with a concurrent command, but also gives greater control than what was possible with str.
- ✓I will come back to work on this last item, but if you want to add a chain to a concurrent command, you will have to edit the config file, any other type can be done through the ui. It will take me more than a min to code, because I would like it so that when you click on the chain command in the list, its commands will display to the right of it, so you can adjust the order in which they are executed along with adding commands to that chain command. Given the posibility of multiple chains within the same concurrent command, I know it will take me a while to complete.
- ✓If you want to continue running the old set up, just download a previous version, 2.0.128 for example should be a stable version with no issues
[
  {
    "label": "dev:all",
    "path": "devApp, devCalc",
    "type": "concurrent"
  },
  {
    "label": "devApp",
    "path": "cd apps/app && pnpm run dev",
    "type": "powershellCommand",
    "hidden": true
  },
  {
    "label": "devCalc",
    "path": "cd apps/calc && pnpm run dev",
    "type": "powershellCommand",
    "hidden": true
  },
  {
    "label": "clean:all",
    "path": "cleanApp, cleanProd, cleanCalc, cleanRoot",
    "type": "concurrent"
  },
  {
    "label": "cleanApp",
    "path": "cd apps/app && foreach ($path in @('.cache', 'build', 'node_modules', 'pnpm-lock.yaml',  'public\\build' )) { if (Test-Path $path) { Remove-Item -Path $path -Recurse -Force -ErrorAction SilentlyContinue } }",
    "type": "powershellCommand",
    "hidden": true
  },
  {
    "label": "cleanProd",
    "path": "cd apps/prod && foreach ($path in @('.cache', 'build', 'node_modules', 'pnpm-lock.yaml',  'public\\build' )) { if (Test-Path $path) { Remove-Item -Path $path -Recurse -Force -ErrorAction SilentlyContinue } }",
    "type": "powershellCommand",
    "hidden": true
  },
  {
    "label": "i:all",
    "path": "iapp, iProd, iRoot, iCalc",
    "type": "concurrent"
  },
  {
    "label": "iRoot",
    "path": "pnpm i --prefer-offline --no-cache",
    "type": "powershellCommand",
    "hidden": true
  },
  {
    "label": "iapp",
    "path": "cd apps/app && pnpm install --ignore-workspace && cd ../..",
    "type": "powershellCommand",
    "hidden": true
  },
  {
    "label": "iProd",
    "path": "cd apps/prod && pnpm install --ignore-workspace && cd ../..",
    "type": "powershellCommand",
    "hidden": true
  },
  {
    "label": "iCalc",
    "path": "cd apps/calc && pnpm install --ignore-workspace && cd ../..",
    "type": "powershellCommand",
    "hidden": true
  }
]
NOTE
- tested thoroughly and works, I dont remember if I have a section yet for this, but leaving this here as a reminder to check when I have time to go over how the dash works on creating them
- the accidental addition of chained command execution works well, I have not had one single issue with a command since this was added
Project Agnostic Configuration
Features
- ✓On workspace switch, creates a new workspace-specific config file and merges it with your global config to form a virtual filing system displayed in the navigator.
- ✓Both global and workspace items can be configured individually within their respective files.
- ✓The snippets file is saved globally when using the extension’s snippet editor.
- ✓Notes, reminders, todos, and their settings are now global.
- ✓The export/import feature simplifies manual config file editing.
- ✓Incoming updates in progress:
- ✓- Ability to toggle global access for folders and their contents.
- ✓- Edit labels of default folders.
MD Section
MD Editor
Features
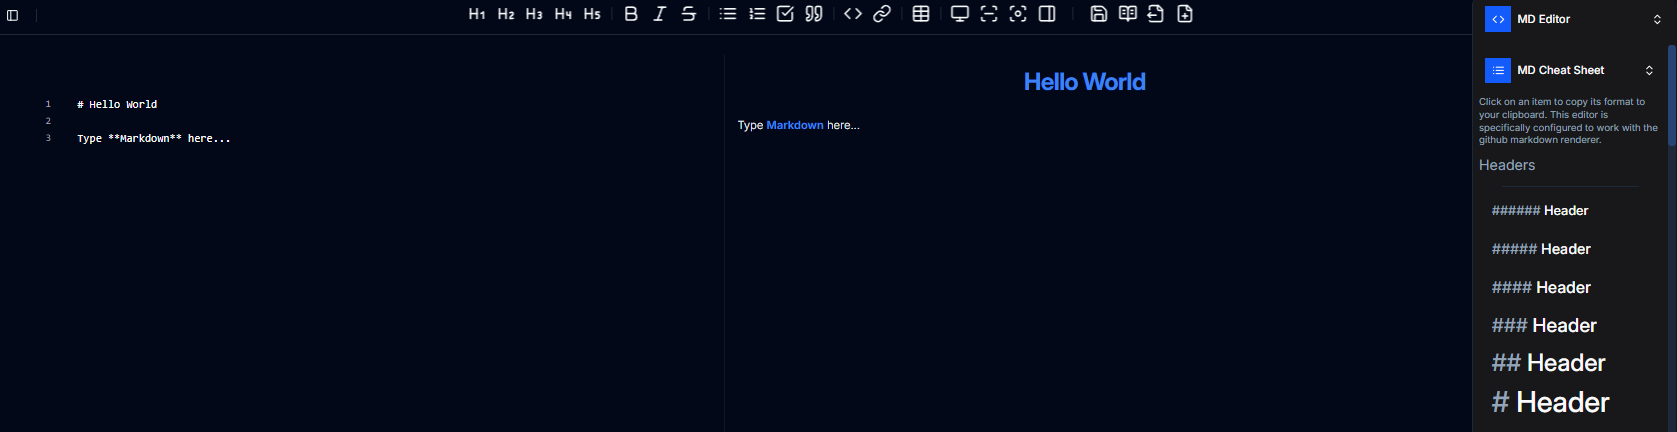
- ✓A rich text Markdown editor that saves to your global user folder, giving you access to your .md files across all projects.
- ✓Sidebar includes:
- ✓Cheat Sheet — click any item to copy its formatting snippet directly to your clipboard.
- ✓Outline — automatically creates bookmarks for each heading to help you navigate your document.
- ✓Files — a UI file explorer to view and open any of your saved Markdown files.
- ✓Renderer — toggle on or off to see your content rendered in real time.
- ✓Choose between inline rendering or split view.
- ✓Focus mode for distraction-free writing.
- ✓Switch between split and inline modes seamlessly without losing your Markdown formatting.
- ✓Export your .md file and save it wherever you like.
- ✓Also supports opening any external .md file outside of the global config directory.
- ✓Added localstorage w/ debounced saves, so incase of a accidental page reload or a lapse in connection, or even just forget to save, whatever you were working on will still be there
Features
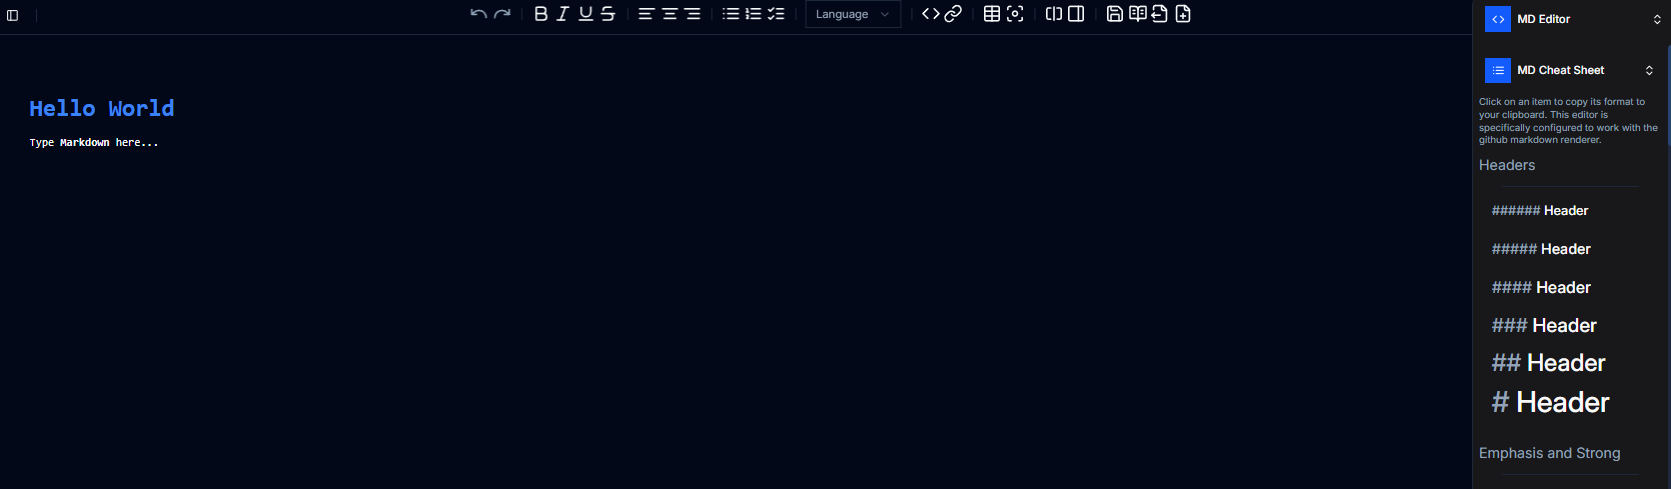
- ✓A second, technically third, editor has been added for users to use
- ✓While there is nothing wrong with the other editor, I just wanted to try a new library out to see its features
- ✓Once it receives the added features the other has, it will be more feature rich than the one previously mentioned
- ✓Using monaco some of the features that are avialable that are not in the other editor are:
- ✓- tabs, with auto save per tab so if your page reloads, all of your data will still be there. Even after multiple days
- ✓- languages, this can also be set per tab
- ✓- renaming tabs
- ✓- full screen display
- ✓- scroll map
- ✓- honestly, there is literally a ton more and to much to list here
- ✓Soon this editor will also receive the sidebar cheatsheet, and readme creator
MD Cheat Sheet
Features
- ✓Comprehensive Markdown cheat sheet accessible anytime without leaving VS Code, separate from the editor
- ✓Includes 100% of GitHub-flavored Markdown formatting examples.
- ✓A sidebar cheat sheet has also been added to the new md editor
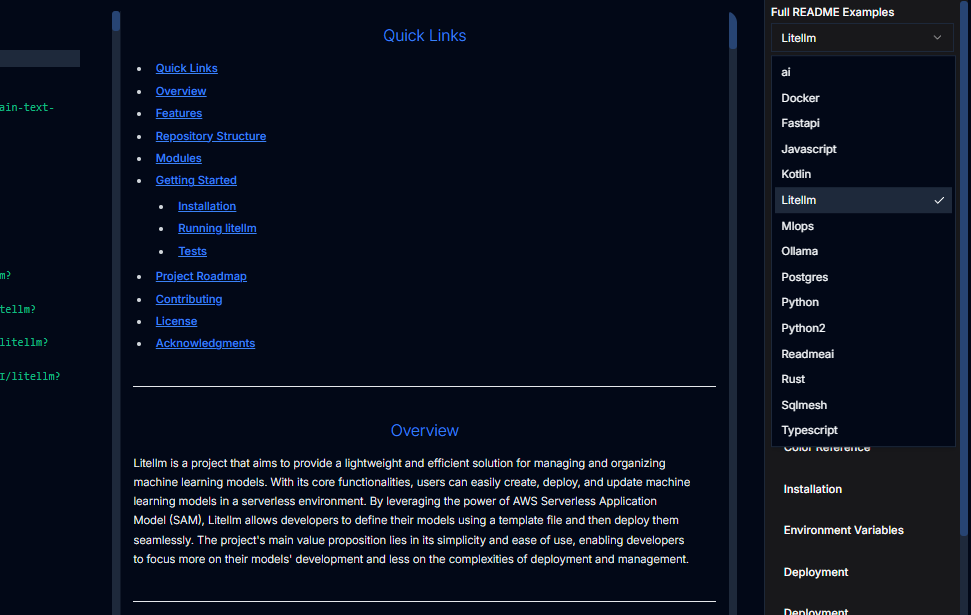
Readme Generator
Features
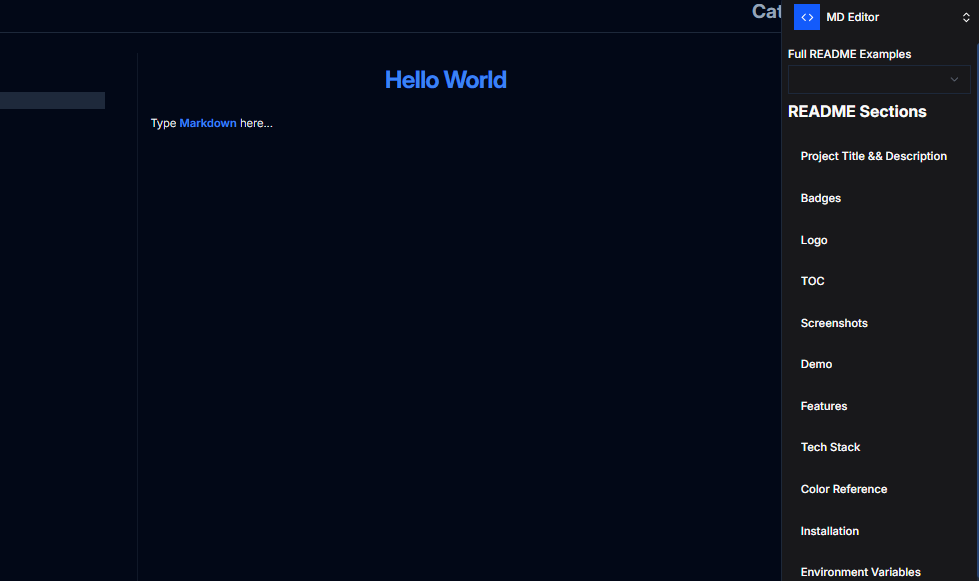
- ✓located in the md editor in the new ui
- ✓In the side bar click any of the section you want to add to the readme and just paste anywhere you want them to go, starting you off perfectly for that section
- ✓a ton of pre build readmes to follow their theme or to get ideas from
Render MD
MD Viewer Renderer
- ✓The original Markdown viewer functionality was inadvertently removed during the extension's upgrade to the UI dashboard. This feature has been restored and significantly enhanced with improved rendering capabilities and expanded functionality.
- ✓- Access Instructions
- ✓ - To view the current Markdown file in the enhanced renderer:
- ✓ - Access **Editor Context**
- ✓ - Navigate to **DevStack** submenu
- ✓ - Select **Render MD**
- ✓- Enhanced Rendering Engine
- ✓ - Rather than utilizing the standard rendering engine employed by most extensions, this implementation opens Markdown files directly in the browser with full rendering capabilities. This approach provides several advantages over traditional preview methods.
- ✓- Current Functionality
- ✓ - The browser-based renderer includes the following features:
- ✓ - **Export Options**: Multiple export formats available for processed content
- ✓ - **Copy Content**: One-click content copying with formatting preservation
- ✓ - **Full Screen Mode**: Distraction-free reading experience with maximized viewport
- ✓ - **Native Browser Performance**: Leverages browser's optimized rendering engine for smooth scrolling and interaction
- ✓- Future Development
- ✓ - Additional functionality expansion is planned based on practical usage patterns and user feedback. The browser-based approach provides a flexible foundation for implementing advanced features that would be difficult or impossible with traditional preview methods.
- ��✓- Enhanced Capabilities
- ✓ - The enhanced viewer represents a significant improvement over standard Markdown preview implementations, offering professional-grade document viewing capabilities within the development environment.
Snippets Section
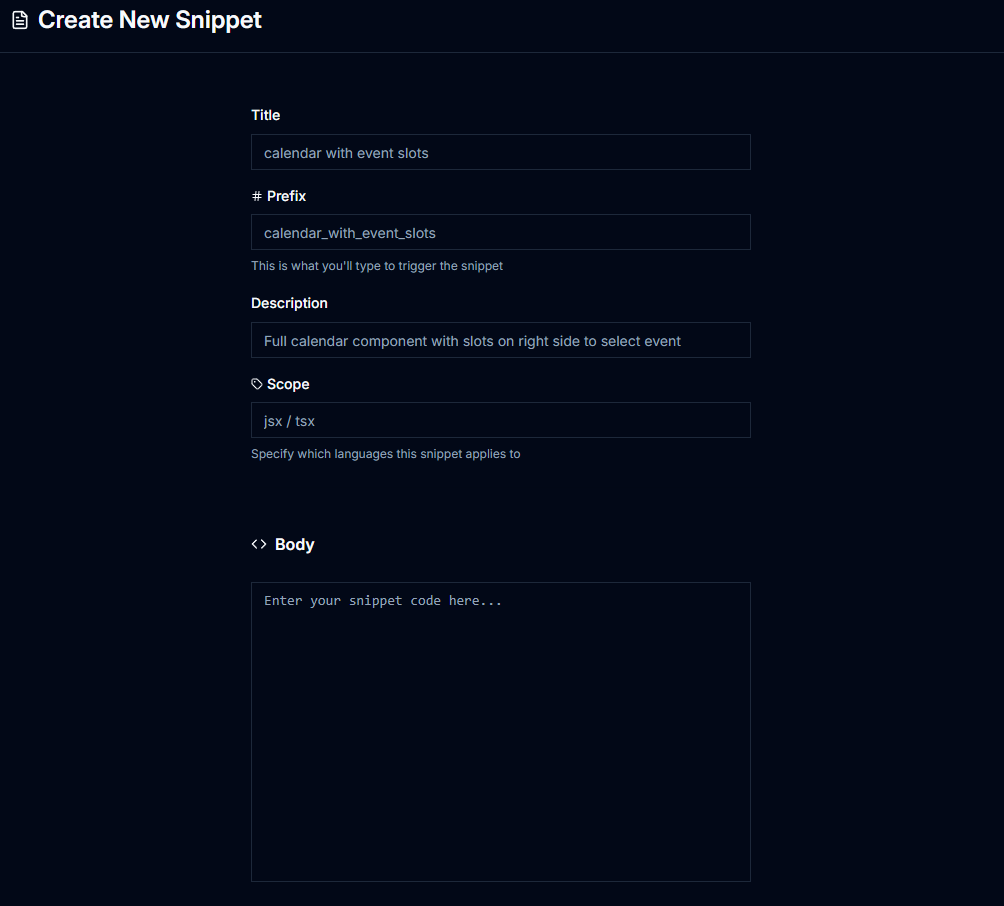
Snippets
Enabling you to create, edit and manage your snippets faster, but importantly, in a much better way
Features
- ✓Creates a new snippet in your global snippets file.
- ✓A dedicated page lets you enter all snippet details before creation.
- ✓If your clipboard contains content, it will auto-fill the body on page load.
- ✓You can select a folder to automatically add the snippet to DevStack within VS Code.
- ✓A switch at the top allows replacing spaces with underscores in the title and prefix—by default, the title is also used as the prefix.
- ✓Press Ctrl + S to save the snippet and navigate to the viewer with your new snippet preselected.
- ✓The prefix field is prefilled with 'jsx' or 'tsx'.
- ✓When creating multiple snippets, saving will return you to the snippets home screen, where Ctrl + N starts a new one.
Config File
- ✓A global master file serves as the centralized location for all your snippets.
- ✓Whenever you create a new project or open one that doesn’t yet have this global file, it copies the data into the `.vscode/` folder, giving you access to snippets for inline insertion while coding.
Global snippets file location
- -AppData/Roaming/Code - Insiders/User/globalStorage/skyler.ocrmnav/ocrmnavigator.code-snippets
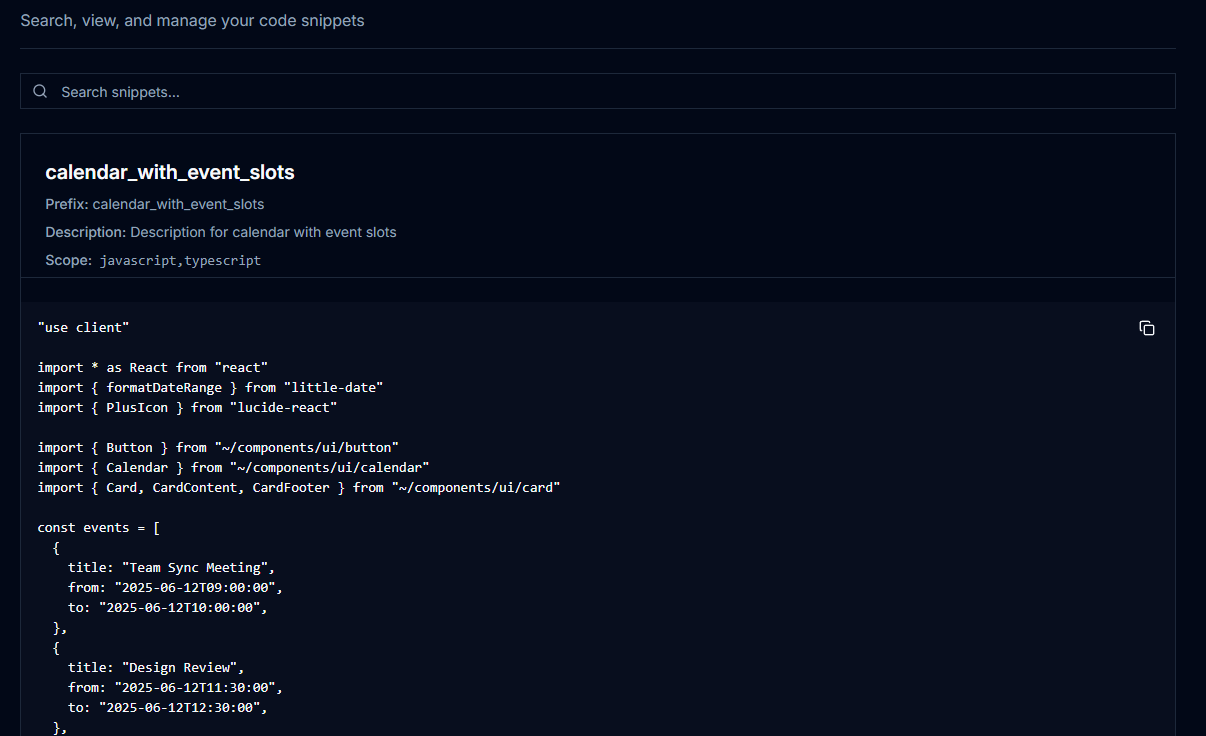
Snippets Viewer
Features
- ✓Contains a search bar with fuzzy search capabilities at the top; as you type, a dropdown shows about the first 7 matching results.
- ✓Selecting a snippet displays it in the box below.
- ✓While a snippet is selected, you can choose to edit or delete it, and at any time, you can create or import new snippets.
- ✓selectiong any of the snippets, opens the editor
- ✓More or less the same as when you create a snippet
Editor Context Snippets
Features
- ✓Right-click in the editor
- ✓Select 'Context Snippets' under the 'DevStack' submenu
- ✓Displays a QuickPick
- ✓allowing you to search or scroll through all of your snippets
- ✓item
- ✓inserts at cursor once a snippet is selected
Formatter Section
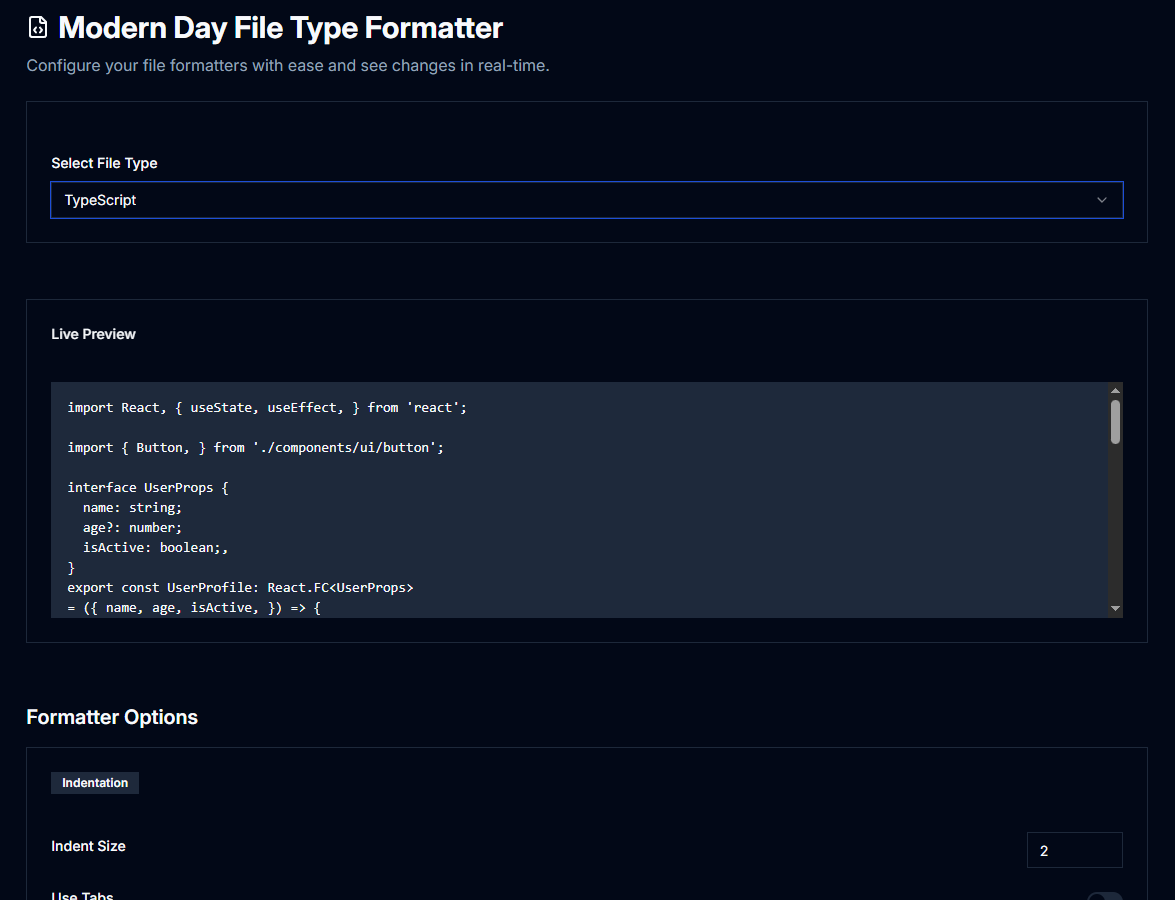
File Type Formatter
Features
- ✓Whether you're brand new or experienced, setting up and using your formatter is simple and intuitive.
- ✓You won't need to Google every option—each setting is clearly explained so you know exactly what it does.
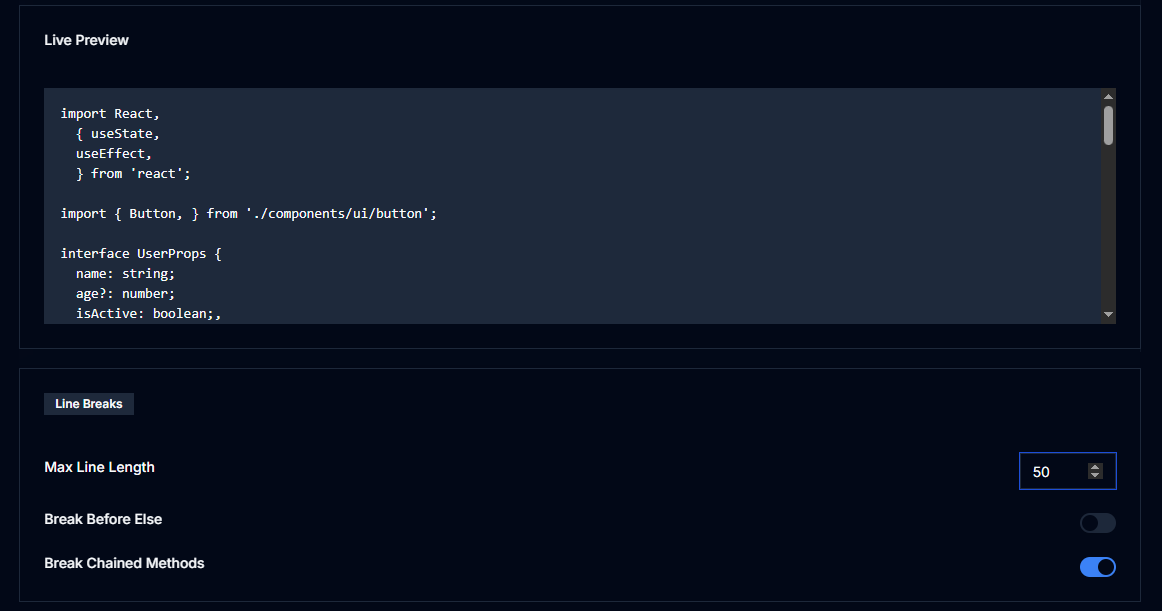
- ✓The formatter opens in an Electron viewer. Select a formatting type to see a live preview along with its available options.
- ✓This is something I always wanted when configuring formatters, and never found—so I built it in.
- ✓Live preview shows exactly what each change does in real time, making it easy even for beginners to configure without research.
- ✓As you scroll through the settings, the live preview scrolls with you, so you can always see the effect of your changes.
- ✓Right-click anywhere in the file and choose the extension’s formatter to apply formatting.
- ✓Currently supports 33 out of 72 planned formatters—each change updates the preview immediately.
- ✓The preview panel is sticky, so as you scroll through formatting options, you can still see the live output without losing your place.
- ✓Support for more formatters is on the way. As I work in different formats, I add what's missing to avoid needing extra extensions or leaving files unformatted.
- ✓added all of the currently available formatters to be set as default within vscode
Inline Imports
Features
- ✓converts imports into single line
- ✓at the same time converting @/ to ~/
- ✓right click in editor, under formatters select formatters
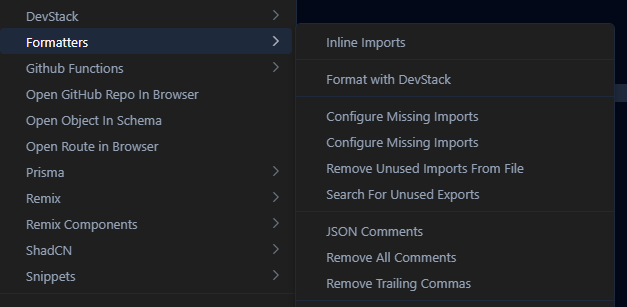
Remove Trailing Commas
Features
- ✓Right-click in the editor and select from the Formatters submenu to remove trailing commas from JSON files.
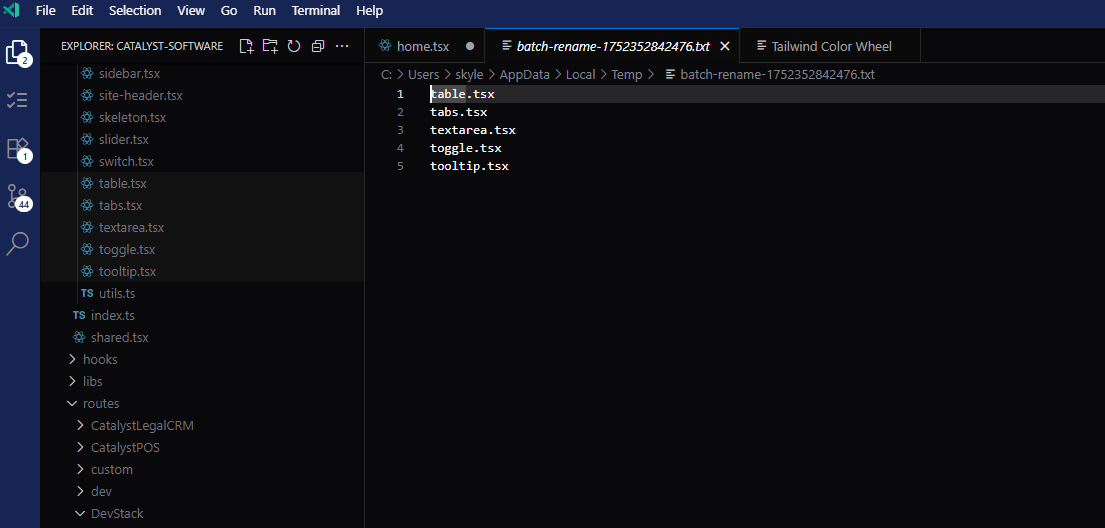
Batch Rename
Features
- ✓Select file(s) in the VSCode explorer.
- ✓Opens a .txt file listing the names in a single column.
- ✓Mass edit file names and/or extensions.
Add Missing Imports w/ Global Config
Features
- ✓Right-click in the editor and select 'Add Missing Imports'.
- ✓Also, there is an option to configure a globally accessed file for commonly used imports.
- ✓Configure the global imports file to streamline your import statements.
Add ESlint & Prettier configs
Features
- ✓Right-click in the editor or explorer.
- ✓Select 'Add ESLint & Prettier configs'.
Remix-Run
Specific features used with the remix-run platform. npx create-remix@latest... Remix v2 is now part of React Router!... sigh...
create-remixv2
Still want to use npx create-remix?
Use this in its place:
- ✓$ npx create-remixv2
- ✓Uses the same platform, just a different builder to create your remix app
- ✓lets you choose pkg mgr and template at build time, lets you choose from remixs base templates and 30 of the most used stacks
- ✓wont add anymore stacks as you can reference the stack you want on the cli when you run the command user/repo
Auto Create Action
Create complex actions with a click.
Features
- ✓Form Detection
- ✓Scans for both <Form> and fetcher.Form components
- ✓Also detects programmatic submissions via fetcher.submit()
- ✓Intent + Schema Parsing
- ✓Extracts intent from form data
- ✓Detects schema via {/** user */} comments (defaults to test)
- ✓Detects schema via a comment above the form that the function will be able to search for the schema object followed by its data, the second word in the comment will be for update functions, for the where aspect
- ✓ie: // Inventory id
- ✓ie: {/** Inventory id */}
- ✓Prisma Method Inference
- ✓Auto-detects CRUD operation based on intent name:
- ✓deleteProgress → prisma.[schema].delete()
- ✓updateItem → prisma.[schema].update()
- ✓Incremental Updates
- ✓Checks existing action for duplicate intents
- ✓Preserves auth/session logic
- ✓Appends new conditions before the final return
- ✓VS Code Integration
- ✓Works with active editor
- ✓Shows warnings when no forms are found
Custom Remix Stack - 8an3/Bane
Mono repo variant coming soon, both will be converted to react-router once I make the switch
git clone https://github.com/8an3/bane-stack.gitgit clone https://github.com/8an3/bane-stack-monorepo.gitFeatures
Features
- ✓The goal? Starting off with a project, that already has the recources to complete everything you need to code. From hero sections, to sidebars, to pre configured tables... That way your not off wondering the internet looking for ideas, components or code, thus wasting a huge amount of time.
- ✓Intentionally leaving the core of the stack, the default remix stack w/ vite, unchanged as most of the time this is one of the items that seems to take the least amount of time when building your app. Your only doing it once for the project, not 1-10 times per route
Tech
- ✓Radix ui / shadCN components
- ✓v1 route convention
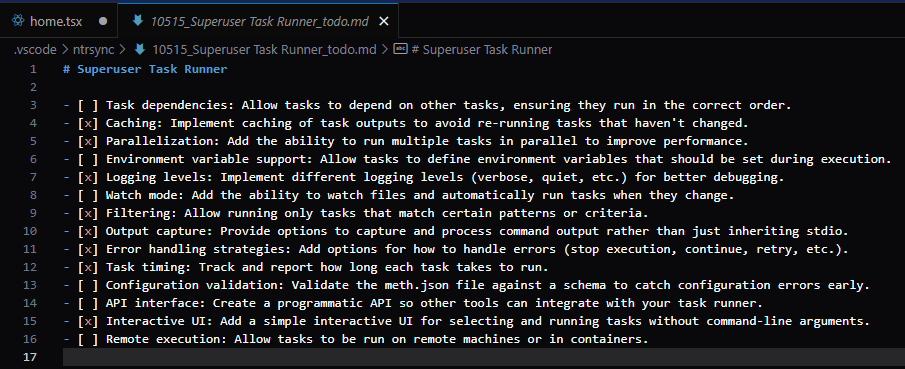
- ✓Superuser Task Runner
- ✓TanStack Tables
- ✓React Day Picker
- ✓Remix Auth
- ✓Contains default route template
- ✓pre-made sidebar with header and footer dropdowns
- ✓Clean pre configured tanstack table, one for any type of data, and another designed for a ticketing system
- ✓Adding all of shadCN blocks w/ its own submenu that branches by category - currently adding them to a section in my stack, so the code is already added, just import where you want to use them, there is a section to view them when you get a dev server up and running - not completed
Overview of some of the items you can find within the project
Blocks
- ✓sidebars
- ✓calendars
- ✓charts
- ✓dashboards
Custom UI
- ✓announcement
- ✓callout
- ✓data
- ✓debouncedInput
- ✓filter
- ✓fuzzyFilter
- ✓fuzzySort
- ✓incId
- ✓loadErrorPage
- ✓loading
- ✓loadingPage
- ✓nav
- ✓nav
- ✓nav
- ✓NavButton
- ✓options
- ✓PaginationButton
- ✓smallTable
- ✓team
- ✓tooltipButton
- ✓table
Examples
- ✓Authentication
- ✓Cards
- ✓Dashboard
- ✓Forms
- ✓Music
- ✓Playground
- ✓Tasks
Sections
- ✓BentoGrid
- ✓Blog
- ✓Changelog
- ✓ConfigSection
- ✓Contact
- ✓Content
- ✓CTA
- ✓DisplayCode
- ✓DisplayGithubInstall
- ✓DisplayInstallCode
- ✓DisplayInstallCodeArray
- ✓FeatureSection
- ✓HeroSection
- ✓ImageSection
- ✓JsonSection
- ✓Newsletter
- ✓NoteSection
- ✓PageHeader
- ✓PageNav
- ✓Pricing
- ✓SectionTitle
- ✓Stats
- ✓Team
- ✓Testimonial
- ✓TsxSection
- ✓UsageSection
- ✓UsageSectionNoDash
Utils
Ecommerce
- ✓CategoryFilters
- ✓CategoryPage
- ✓CategoryPreviews
- ✓CheckoutForm
- ✓CheckoutPage
- ✓DetailsScreen
- ✓FeedComponents
- ✓GridLists
- ✓HomeScreen
- ✓IncentiveSection
- ✓LandingPage
- ✓OrderDetailsPage
- ✓OrderHistory
- ✓OrdersSummaries
- ✓PageHeadings
- ✓PricingPage
- ✓ProductLists
- ✓ProductOverviews
- ✓ProductPages
- ✓ProductQuickviews
- ✓ProductsFeatures
- ✓PromoSection
- ✓ReviewsSection
- ✓SectionHeadings
- ✓SettingsScreen
- ✓ShoppingCart
- ✓ShoppingCartPage
- ✓StackedLayouts
- ✓StackedLists
- ✓StorefrontPages
- ✓StoreNav
Auth
- ✓Remix auth w/ login and logout routes, consisting of username / password
- ✓along with the sessions and authenticator pre-configured
- ✓Also comes with Remix OTP
- ✓Routes are placed in the components folder under /auth/otp
- ✓otp's session function and authenticator are placed in /modules/auth/otp
Open Route File In Browser
Features
- ✓Right-click in the editor.
- ✓Open the Remix submenu.
- ✓- 'Open current route in browser' opens your default browser to the selected page or route.
- ✓- 'Preview URL' copies the URL to your clipboard.
- ✓- made port dynamic by editor context
Create Route Files
Features
- ✓Right-click in the editor.
- ✓Open the Remix submenu.
- ✓Select any available option to insert at the cursor position.
Context Components / Functions
Features
- ✓Right-click in the editor.
- ✓Open the Remix Components submenu.
- ✓Select any option to insert at the cursor position.
V2 -> V1 Routing Convention Conversion
Features
- ✓Converts routes from the v1 routing convention to the v2 routing convention. If any issues occur, it restores routes to their original state.
- ✓Right-click in any editor and select 'Convert v1 routing to v2' from the Remix submenu.
- ✓As a precaution for rare bugs, be sure to push your project before running this command.
Create Single Project Function
Features
- ✓viewers dropdown menu, under master apps
Create Mono Repo Project
Main apps included are remix, shadcn components, tailwind, and various others
Features
- ✓viewers dropdown menu, under master apps
Convert Single Project App To Mono Repo
Features
- ✓converts the app into the same configuration of mono repo as above
Routing Convention Conversion Remix-Run
Converts routes from the v1 routing convention to the v2 routing convention. If any issues occur during conversion, routes will be restored to their original state.
Features
- ✓Right-click in any editor and select 'Convert v1 routing convention to v2' from the Remix submenu.
- ✓As a precaution against rare bugs, be sure to push your project before running.
Create Tests for Routes and Actions In Remix-Run
Converts routes from the v1 routing convention to the v2 routing convention. If any issues occur during conversion, routes will be restored to their original state.
Features
- ✓Right-click a file in the editor and select 'Create Test For Route & Action'.
- ✓Creates a results page at `routes/tests/dashboard.tsx` if it doesn't already exist.
- ✓Generates test files in `routes/tests` with filenames matching the files being tested.
- ✓Visit the dashboard and click 'Run' to view results for all created tests.
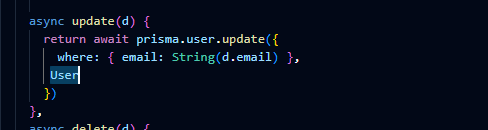
- ✓Automatically pulls actions and creates tests for every `prismaexport` function.
- ✓For updates requiring parameters, it fetches the first object from the database for that model.
- ✓Ensures proper testing by reading the model from the schema file to provide correct parameter types (e.g., String, Boolean).
Install Auth in Remix w/ Auth Routes
Features
- ✓Right-click `package.json` and select 'Install Auth in Remix w/ Auth Routes'.
- ✓- including all of its scaffolding, editor context
- ✓in the viewers drop down, under Projects
Install OTP Into Remix w/ Auth Routes
Features
- ✓Right-click `package.json` and select 'Install OTP Into Remix w/ Auth Routes'.
- ✓Creates login, logout, and all necessary files for OTP functionality, then installs dependencies.
Convert Remix-Run File to Platform Agnostic
Features
- ✓- Initial testing was succesful but I have not had the time to thoroughly test this, mileage may vary
- ✓- converts a remix run route, to one of 6 commonly used
- ✓- after right clicking file in the editor, quick pick menu displays with the available options
- ✓- converts all remix run functionality to the chosen platforms flavour
React-Router
npx create-remix@latest... Remix v2 is now part of React Router!... sigh...
Features
File / Folder Based Routing
- ✓Directory Structure Convention
- ✓src/
- ✓ routes/
- ✓ index.tsx -> /
- ✓ about.tsx -> /about
- ✓ users/
- ✓ index.tsx -> /users
- ✓ [id].tsx -> /users/:id
- ✓ $userId.tsx -> /users/* (catch-all)
- ✓ _layout.tsx -> Layout wrapper
- ✓ _error.tsx -> Error boundary
- ✓ admin/
- ✓ _layout.tsx -> Nested layout
- ✓ dashboard.tsx -> /admin/dashboard
Features
- ✓File-Based Routing:
- ✓index.tsx → /
- ✓about.tsx → /about
- ✓[param].tsx → /:param
- ✓$slug.tsx → /* (catch-all)
- ✓Nested Routes:
- ✓Folders create nested routes
- ✓Supports layout routes with _layout.tsx
- ✓Remix-Like Conventions:
- ✓Automatic route parameter conversion
- ✓Support for loader/action functions
- ✓Error boundaries
- ✓Dynamic Imports:
- ✓Routes are loaded dynamically
- ✓Supports code splitting
Theme Section
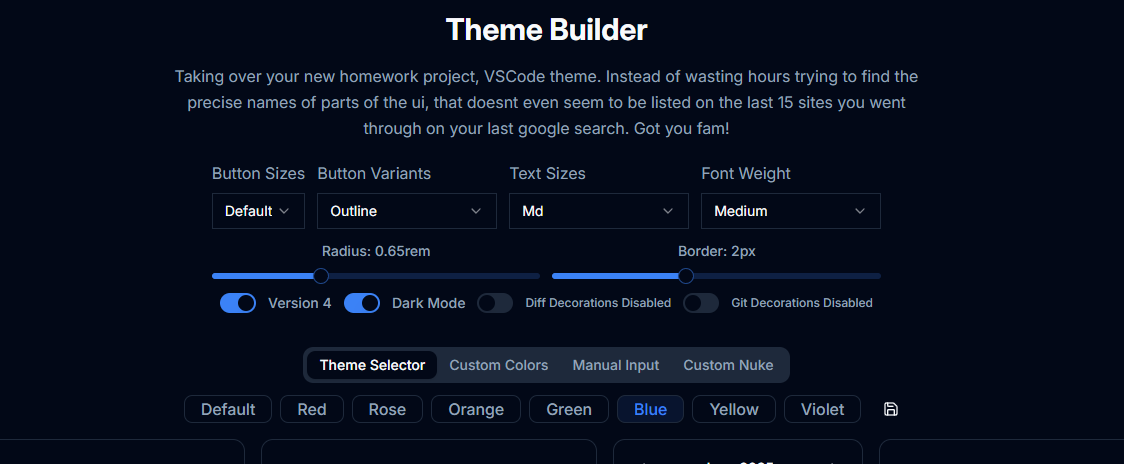
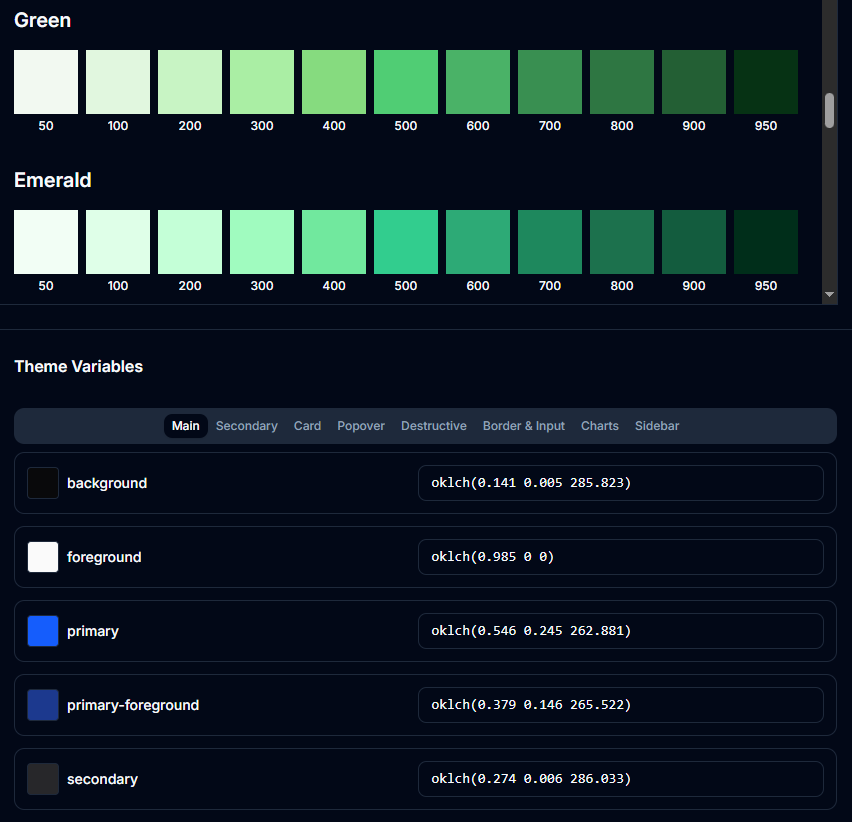
VSCode Color Theme Builder
Features
- ✓Preset Themes - Apply professionally designed, cohesive color schemes across your entire UI in under 15 seconds
- ✓Quick Customization - Modify core colors (background, foreground, primary, etc.) with a streamlined interface that updates the entire UI consistently in under 5 minutes
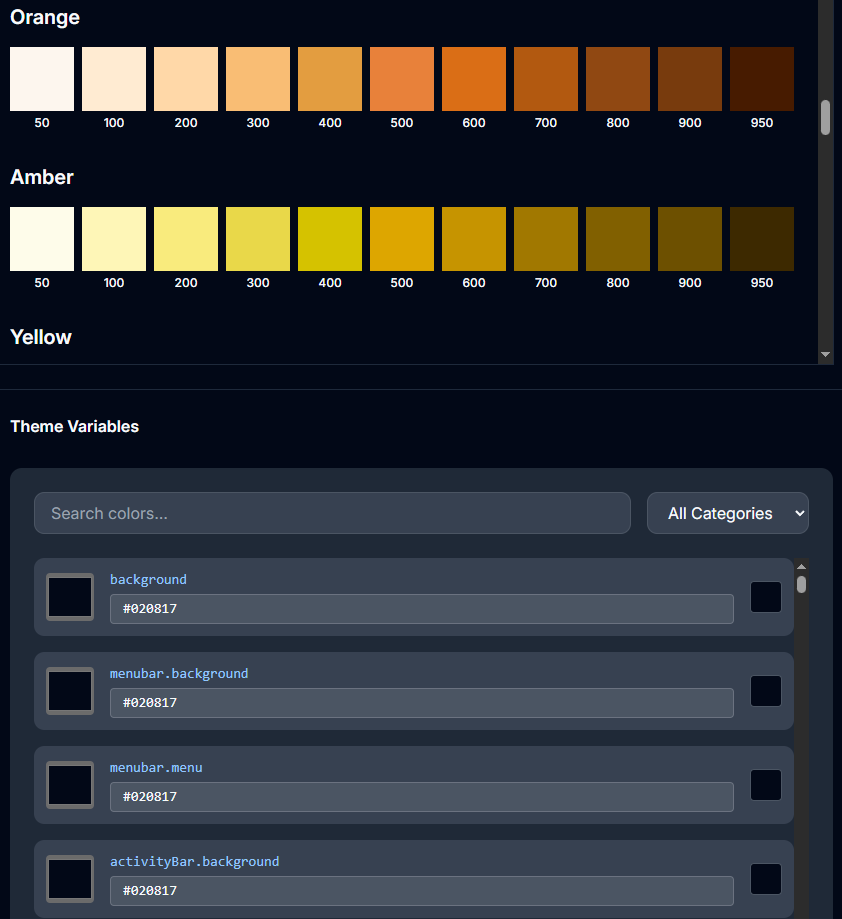
- ✓Full Color Palette - Click any color from the comprehensive palette and instantly apply it anywhere in your theme
- ✓Manual Control - Fine-tune every individual color element for complete customization (time varies by preference)
- ✓Real-Time Preview - Watch your theme changes apply instantly as you design, with live UI updates in the builder
Export & Save Options
- ✓Copy as Tailwind - Generate Tailwind CSS classes from your theme for use in any project
- ✓Copy as VSCode - Export theme to clipboard for manual application elsewhere
- ✓Save to Workspace - Automatically saves to .vscode/settings.json (prompts for workspace selection if multiple are open)
- ✓Save Globally - Applies theme to your global VSCode settings for use across all new workspaces (respects local workspace themes when present)
- ✓The theme builder exceeded original expectations by creating a seamless workflow from design to implementation. The ability to craft a custom theme for your project and instantly apply it to your VSCode environment with a single click transforms the development experience, making theme consistency across web projects and editor environment effortless and intuitive.
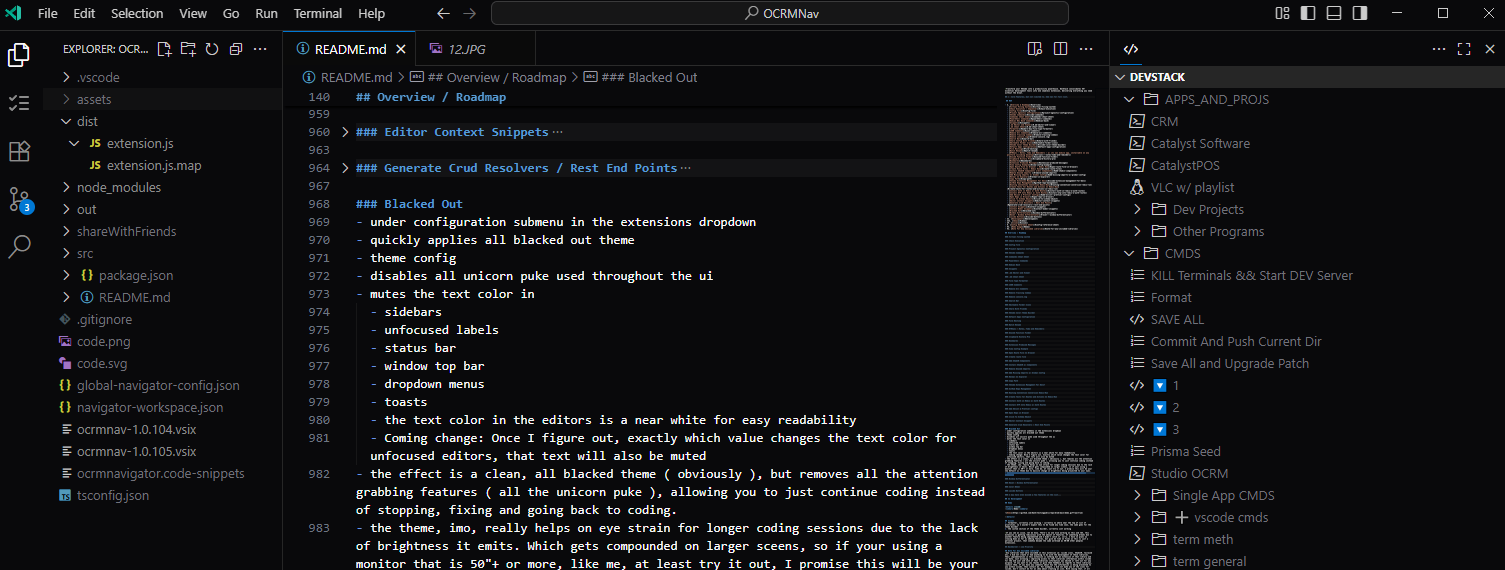
Blacked Out
The effect is a clean, all-black theme (obviously), removing all the attention-grabbing features (the unicorn puke), so you can keep coding without stopping to fix things and get back into flow
Features
- ✓Under 'Configuration' submenu in the Extensions dropdown
- ✓Quickly applies the all-black theme
- ✓The theme really helps reduce eye strain during long coding sessions due to its low brightness — especially noticeable on larger screens (50"+). If you're using a big monitor like me, give it a shot — it might become your new default UI theme because of the massive reduction in screen glare
- ✓Added this as a separate feature in the Theme Configurator for quicker and easier access
Theme Config
- -Disables all unicorn puke used throughout the UI
- -Mutes the text color in:
- -- Sidebars
- -- Unfocused labels
- -- Status bar
- -- Window top bar
- -- Dropdown menus
- -- Toasts
- -- Editor text is set to a near-white for easy readability
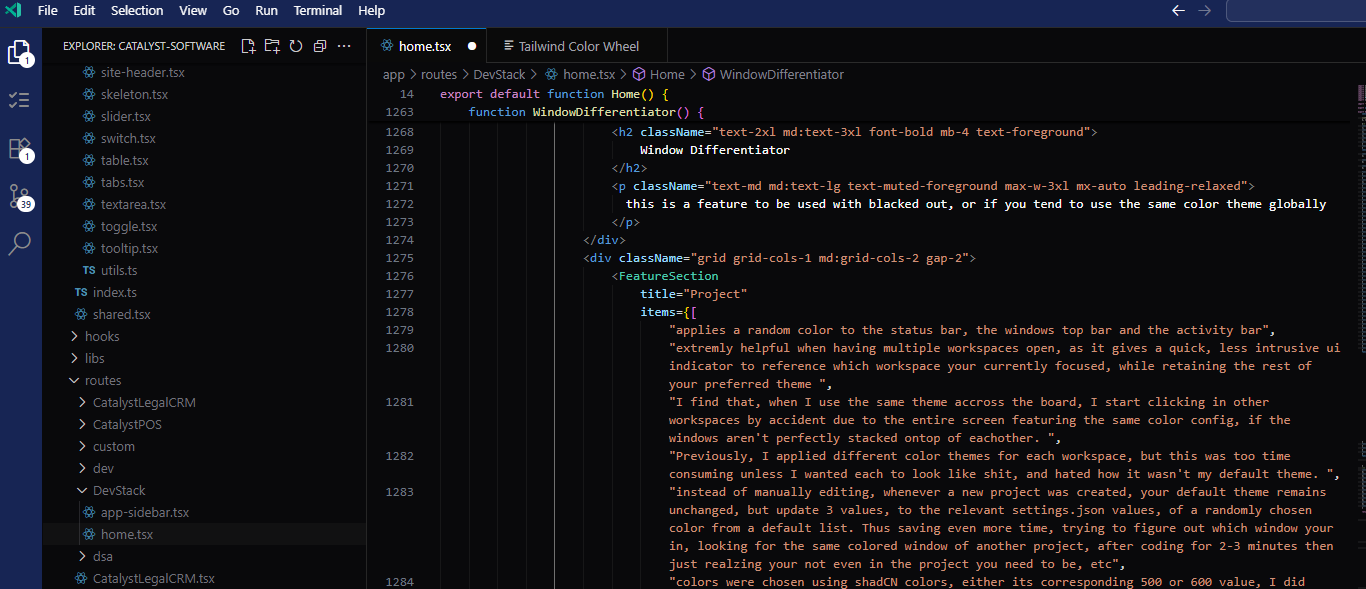
Window Differentiator
his feature is intended for use with Blacked Out, or if you prefer using the same color theme globally
Features
- ✓Applies a random color to the status bar, window top bar, and activity bar
- ✓Extremely helpful when working with multiple workspaces, providing a subtle, non-intrusive UI indicator to show which workspace is currently focused — all while keeping your preferred theme intact
- ✓Instead of manually editing settings for every new project, this keeps your default theme intact and only updates 3 values in `settings.json` with a randomly chosen color from a default list — saving time and preventing confusion after coding for a few minutes in the wrong window
- ✓Colors are chosen from shadCN’s palette, typically the 900 or 950 variants — I excluded rose, fuchsia, and a few others I couldn’t stand
Reset - Window Differentiator
Features
- ✓Replaces the values used in the above feature with those from the Blacked Out theme to restore your default setup
ShadCN Section
Add ShadCN Components
Features
- ✓Right click in editor
- ✓In the shadCN submenu
- ✓select an option you would like to insert
- ✓inserts component at cursor
Install ShadCN w/ Components
Features
- ✓Or select viewers
- ✓In the project submenu
- ✓select install shadcn with components
Catalyst UI
Catalyst UI
- ✓Catalyst UI operates seamlessly within the editor context, providing developers with an extensive collection of components and templates. Simply select from one of the many categories in the Catalyst UI submenu, choose your desired component or template, and it will be inserted directly at your cursor position.
- ✓- Design Philosophy
- ✓ - Catalyst UI employs many of the same foundational principles as shadCN while pushing certain concepts even further. Every component has been meticulously crafted following a consistent methodology. The decision to closely emulate shadCN stems from shared ideological principles and practical considerations—since beginning my development journey, shadCN has been the one library that consistently delivered without complications. It remains not only the easiest to implement but arguably the most accessible UI library available in the current market.
- ✓ - Interestingly, there appears to be an inverse relationship between cost and complexity in the UI library ecosystem. Premium libraries often introduce unnecessary complexity, which contradicts logical expectations—paid solutions should theoretically provide enhanced ease of use, not additional barriers.
- ✓- Installation / Usage / Compatibility
- ✓ - If you currently utilize shadCN in your projects, no additional installation or configuration is required to leverage the base components alongside approximately 90% of this library's functionality. If you do not, a installation process is provided on the site.
Library Scale
- ✓- This project began as a personal library driven by two primary objectives: accelerating development velocity and expanding capabilities for more sophisticated solutions. Consequently, you may encounter occasional templates or components that haven't yet been refined to match the library's standard quality. While these components remain fully functional, they may not adhere to the same coding standards or implementation patterns as the rest of the collection.
- ✓- Current components count
- ✓ - free: 193
- ✓ - Total: 1808
- ✓- Without intentional effort, this has evolved into what will likely become the largest UI library available. Several additional categories are in development and will be introduced as content becomes available.
Future Expansion
- ✓- The current count of 1808 components will continue growing through several channels:
- ✓ - **Legacy Codebase Integration**: 2-3 additional codebases await review for potential component extraction
- ✓ - **Development Pipeline**: 30-50 components are currently staged for integration
- ✓ - **Feature Roadmap**: An extensive list of planned components and templates awaits implementation
- ✓ - **Organic Growth**: New reusable components, hooks, and page templates are continuously added as development progresses
Community Contribution Program
- ✓- Submission Incentives
- ✓ - Users are encouraged to contribute components through our unique incentive program:
- ✓ - **Reward Structure**: One free month of UI subscription per accepted submission
- ✓ - **Scalable Benefits**: Submit 10, 20, or 30+ components to receive equivalent months of free access
- ✓ - **Attribution**: All submitted components feature proper author attribution on the component page
- ✓ - This community-driven approach represents an unprecedented model in the UI library ecosystem. Conservative projections suggest that even 5-10 contributors with substantial component collections could rapidly expand the library to 1,800+ components.
- ✓- Streamlined Submission Process
- ✓ - Unlike traditional contribution workflows that require repository forking, local development environments, and complex pull request procedures, our submission process prioritizes simplicity and accessibility.
- ✓ - **For registered members:**
- ✓ - Navigate to the 'Submit Component' link in the sidebar
- ✓ - Utilize the integrated Monaco editor interface
- ✓ - Complete the first four lines with identifying information
- ✓ - Input your component code (50-1000+ lines supported)
- ✓ - Submit with a single click
- ✓ - This frictionless approach eliminates unnecessary complexity while maintaining code quality standards. The submission system accommodates complete component packages, including dependencies, helper functions, and associated files—all within a single, cohesive submission.
Development Philosophy
- ✓The underlying motivation for this project stems from a fundamental principle: code should be an investment in future development efficiency rather than a disposable resource. Components that require significant development time deserve preservation and reuse rather than abandonment after single-use scenarios. Upon reaching approximately 200 components, the decision was made to transform this personal collection into a shared resource for the development community.
- ✓Note: The pages category, is more of a holding ground for components than a category. Items are placed there, so that they can still be used as I find time to do the remaining work to put them into their respecitve categories
VSCode Auth
- ✓I literally... just finally finished coding it into vscode... remembering there is a free AND premium tier, thus just giving everyone premium access, haha
- ✓As annoying as that it, atleast I remembered...
- ✓And there is a nice unique way of solving this though, that you benefit a lot from. In terms of syncing accounts, instances or linking via special codes. the extra world requirerd for you to use the library within vscode, is 0 extra work on your behalf. Seriously 0, because you wouldn't even need to log in to, anything actually. As far as your concerned, all that needs to be done to access the premium side of the components in vscode, once you subscribe issss... Open vscode.
- ✓Elegantly solving an issue in where it cannot get any easier, making it seem like the ui library was built straight into vscode
- ✓The one requirement though, signing up with the ui library with the same email as your vscode instance is logged in with
- ✓Which, now that I think of it, takes the easy implementation and coding effeciency idea, an even bigger step in the right direction. If you already have an idea or are comfortable with the library, you don't need to leave vscode to open a browser to get the code for the basic function setup.
- ✓The code is just being injected into the file from vscode.
- ✓Allowing users, with only one or two days of use to be at the same profiency level, as someone who memorized all of the components and naming comventions for all its features ie: someone who has been using the library for a year or more.
- ✓Because to memorize, every components build structure, no matter how simple its build, takes time. A simple example is card where you have, what 6 or 7 functions that are children based to remember, not even mentioning params and remembering what goes where, to do what functionality you want to accomplish. On the more complicated end, even I still don't remember them all tbh, context menu that has 16, dropdown menu has 15, meanwhile my version of sidebar has 29. As long as your not trying to do something complicated, it brings down the time to mastery, drastically.
- ✓While I have been implementing ideas and features to help users with this from the get go, I know the vast majority, if not 99% of them, this type of mindset, hasen't even cross their minds. Which sucks for us devs, because we are the ones who sufer from it, by wasting time on things that shouldn't be there
GitHub Section
GitHub Repo Management
Features
- ✓In the quick pick menu on the status bar (bottom-left corner), find and select 'DevStack'
- ✓choose one of the first four options
- ✓Added automatic add, commit, push, and versioning features
- ✓Includes behind-the-scenes handling of clean or dirty local repositories to ensure execution regardless of state.
Open Repo in Browser
Features
- ✓Right-click in the editor or explorer.
- ✓Select 'Open GitHub Repo in Browser'.
- ✓Opens your default browser to the repository.
Open GitHub Repo At File
This is NOT replacing the original variant
Features
- ✓- instead of just opening your repo in the browser, it will navigate to the file within the repo from where you activated this function
- ✓- I use this, way more than I thought I would. But it triggers me every time I use it, then having to still navigate to the file from where I activated the function. Some code bases, we all know how easy it is to get around. But if it's a larger code base with github's annoying nuances within the sidebar nav... fuck that... I know, talk about first world coding problems, but still triggers me when it shouldn't obviously this extension pampers you
- ✓- it should reside right underneath the original variant for easy access
- ✓- sigh, the dev host is bugging out not allowing me to test... fuck, well... when in doubt, yeet, I guess
- ✓- ***Borat voice: 'Yeet was great success!'***
Prisma Section
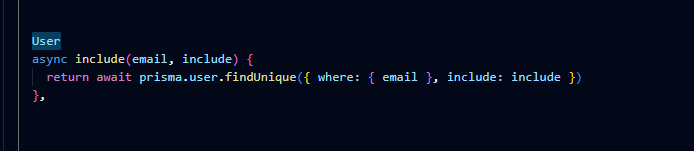
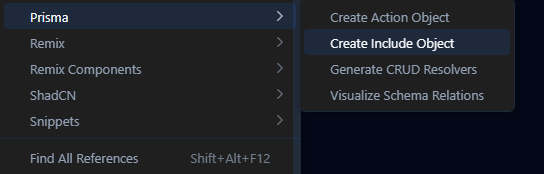
Create Include Object
Features
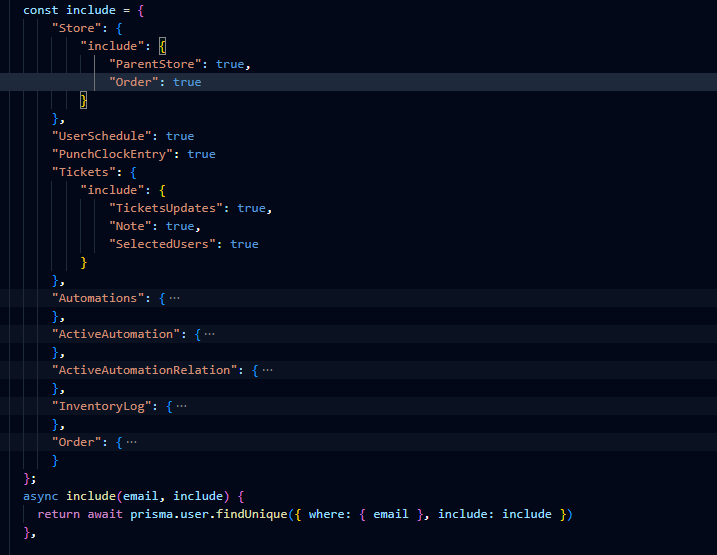
- ✓highlight, then right click on the schema object name in editor and select create includes object
- ✓it will grab all the nested relations from your schema and produce an object where it will include all relative schemas automatically
- ✓going 2 deep
- ✓In the images I'll show how to best work with it
- ✓1. above your prisma function type the schema object capatalized
- ✓2. highlight and right click and select the option under prisma
- ✓3. the include variable will be built for you automatically
- ✓for the action portion, almost same as above, but instead type the schema object where you would put data: and repeat the remaining steps
Create Action Object
Features
- ✓same as above but for create/update prisma statements
- ✓right click in editor, under prisma select Create action object
- ✓going 2 deep

Click To Schema Object
Features
- ✓Right-click a model name anywhere in your project.
- ✓Select 'Open Schema Object' under the Prisma submenu.
- ✓Opens your schema file at the location where that object is defined.
Generate Crud Resolvers / Rest End Points
Features
- ✓Hover to highlight or select items and generate resolvers or REST endpoints
- ✓Preview by hovering to highlight or select, then generate resolvers or REST endpoints
- ✓
- ✓Open the Prisma submenu
- ✓Select 'CRUD'
VSCode Extension Managment For Devs
When working on VSCode extensions, added a feature for easier installing and upgrading. Accessible via the quick pick menu on the status bar, working seamlessly whether the workspace is clean or dirty.
'Clean' and 'dirty' refer to whether your local repository matches the remote repository. Upgrading requires your local repo to be in sync with the remote. More importantly, this feature automatically adds versioning to each push with zero extra effort, enabling you or your users to reference older code easily.
Features
auto add commit and push
- ✓Saves all files.
- ✓Stages all changed files.
- ✓Commits with an automatic message.
- ✓Finally, pushes the commit to the remote repository.
auto upgrade patch
- ✓Continuation from above.
- ✓Upgrades the patch version.
- ✓Pushes changes to GitHub.
auto upgrade patch, create and reveal vsix
- ✓Continuation from above.
- ✓Creates the VSIX package.
- ✓Opens Windows File Explorer at the VSIX location for quick upload.
- ✓Automatically opens Microsoft Publisher’s Extensions page.
- ✓Installs the VSIX in VSCode and reloads extensions while updating on Microsoft’s site.
yeet, slight difference from above, as the name states its just a one button click to do everything
- ✓Saves all files.
- ✓Starts a wait sequence for a new `.vsix` file to appear in the root folder.
- ✓Displays a toast notification to cancel the wait sequence.
- ✓Pushes changes to the repository.
- ✓Upgrades the patch version.
- ✓Builds the package.
- ✓Installs the package.
- ✓Reloads the UI.
- ✓Pushes the VSIX package to the marketplace.
System Files Section
File Nesting
Features
- ✓Currently in developement...
Reveal In Explorer
Features
- ✓Right click a file in the navigator to reveal in explorer
Copy Path
Features
- ✓Right click a file in the vscode panel and select copy path
UI Section
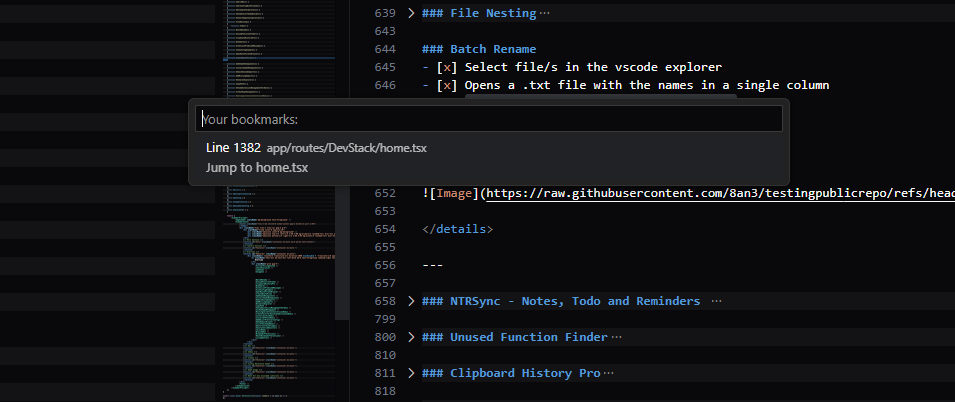
Bookmarks
Features
- ✓Right-click the line in the file you want to bookmark and select 'Bookmark'.
- ✓Keeps up to 20 bookmarks.
- ✓Bookmarks accessible through the status bar button.
Remove Extension Produced Messages
Currently in developement...
Features
- ✓Removes all console.log messages.
- ✓Suppresses all vscode.window.showInformationMessage toasts.
- ✓Suppresses all vscode.window.showErrorMessage toasts.
- ✓All messaging is centralized. A status bar button labeled '$(warning) Messages' opens a quick pick dialog with color-coded messages:
- ✓- Grey: console.log and info messages.
- ✓- Red: errors.
- ✓- Green: success messages.
- ✓Note: The first version didn’t work as expected and is currently disabled. It will be reworked.
- ✓The goal is to remove all toasts from this extension and centralize messaging.
Search Bar
Features
- ✓Button on the title bar for faster access.
- ✓Experimental second quick-access panel designed for fast searching—useful for large projects where certain files are accessed often enough to matter, but not often enough to occupy space in the main quick access panel. Includes items from the first panel too. Still in testing.
- ✓Configuration is done by editing the config file directly.
- ✓Uses the same object structure as the main nav config.
- ✓Currently limited to the workspace scope, since its items are only relevant per workspace.
- ✓Accessible from the extension UI.
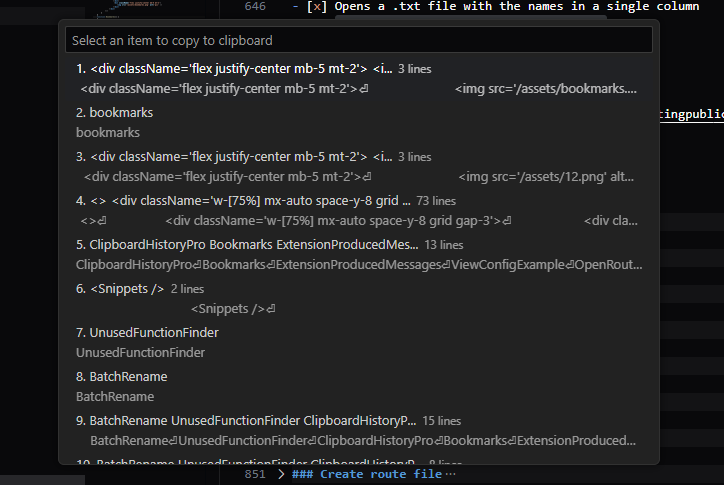
Clipboard History Pro
Features
- ✓Button in the status bar that opens a quick pick showing the last 20 clipboard items.
- ✓Hover over an item to see the full content in a tooltip.
- ✓Click an item to copy its contents back to your clipboard.
- ✓Clipboard history accessible via the status bar button.
Reference Section
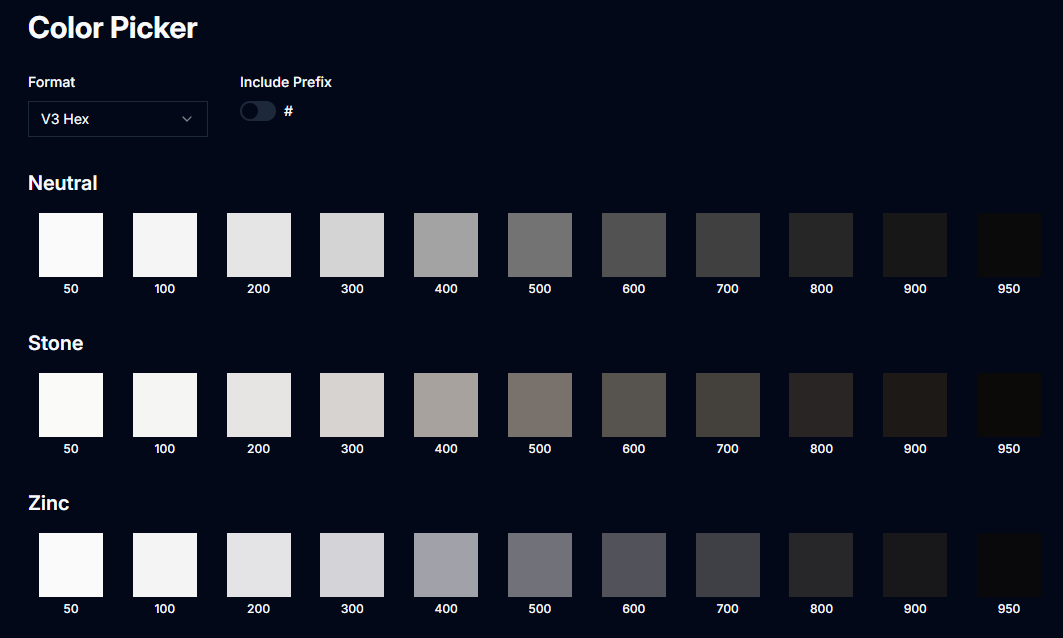
Color Wheel
Bringing ShadCN's color picker to you within, vscode
Features
- ✓Instead of relying on sources outside VSCode, this creates a more seamless, efficient workflow — a recurring theme focused on cutting down time wasted switching to the browser to find information. I'll be reviewing other commonly used sources and integrating them as well
- ✓Opens an editor with a webview
- ✓Displays all colors with V3 HEX, V4 OKLCH, and V4 CSS Custom Properties
- ✓Toggle to include or exclude the hashtag when copying a color value to the clipboard
- ✓Copies the selected color value to the clipboard
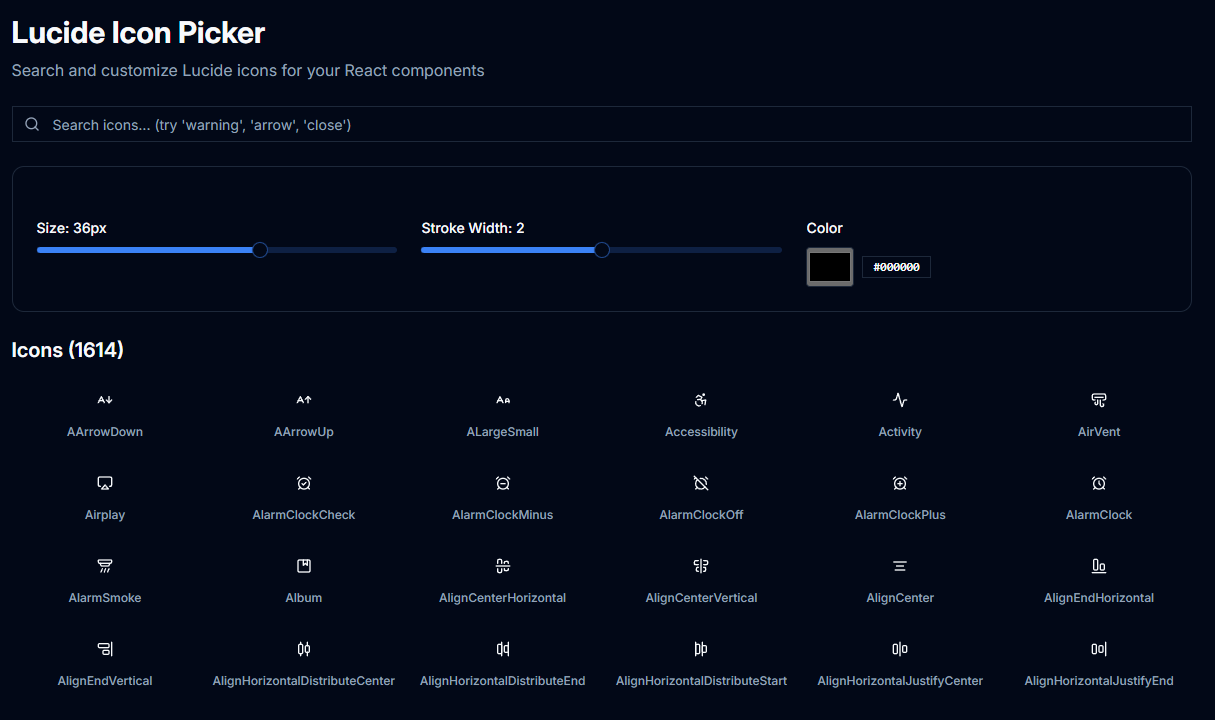
Lucide Icons
Features
- ✓w/ Fuzzy Search
- ✓Wider Search Params - each icon has a pool of params that wil provide the correct icon even if the user searches by another libraries name
- ✓includes customizer that provides its values within a className
- ✓when selected the jsx object, with or without the className, will be copied to your clipboard with the correct naming convention for jsx/tsx and ready to be pasted where ever its needed
- ✓added pagination, updates to size, width and color are instant
Tailwind Converter
Converters are currently all over the map, in terms of their outputs. Ranging in colors, they all seem to be close enough aside from a few really getting the input wrong. This hasn't been tested thoroughly so whatever your result is, if its not close I apoligize but this will be a tool that I will continue to chip away at in chasing perfection with conversions.
Features
- ✓v3 to v4 tailwind conversion and vice versa
- ✓takes your entire root or dark input for example:
- ✓ --background: 0 0% 100%;
- ✓--foreground: 0 0% 3.9%;
- ✓--card: 0 0% 100%;
- ✓--card-foreground: 0 0% 3.9%;
- ✓--popover: 0 0% 100%;
- ✓--popover-foreground: 0 0% 3.9%;
- ✓--primary: 0 0% 9%;
- ✓--primary-foreground: 0 0% 98%;
- ✓but includes an example input via ui button
Notes, To-Dos And Things
The universal productivity companion that grants access, anywhere - from your IDE to your phone to any web browser.
Features
- ✓Currently still a seperate extension but the merge is in development
- ✓Wider Search Params - each icon has a pool of params that wil provide the correct icon even if the user searches by another libraries name
- ✓includes customizer that provides its values within a className
- ✓when selected the jsx object, with or without the className, will be copied to your clipboard with the correct naming convention for jsx/tsx and ready to be pasted where ever its needed
- ✓added pagination, updates to size, width and color are instant
Task, Notes and Things is a comprehensive productivity solution designed for developers and teams who need their notes, todos, and reminders accessible across every device and platform. Unlike traditional note-taking apps that lock you into proprietary ecosystems, this app leverages GitHub as your single source of truth, giving you the power of version control, collaboration, and universal accessibility.
Features
- ✓Virtually, every dev has had to make a notes / to do / reminder app. So why is it that, there isn't a decent option available in the marketplace. All the options I tried had the jankiest ui's. Then, there isn't even an option that supports presenting the data to you via your phone or anywhere else outside vscode
- ✓App Goal: Whenever and no matter what I am, I have access to the data, where I can add, edit or delete data, along with the same data being accessible in vscode, ofcourse
- ✓How is there not even an option, that has decent, albeit jank, ui
- ✓The VSCode implementation, I implore people to atleast try it if you need it. I would ask that you create your own mobile versions ( if it isn't already, I will make the library public so all you have to do is install locally, install libraries ( because vercel needs a lockfile ), push to github and create the project on vercel ). The only reason I'm leaving access open is because, there is no option out there. For newer users, do not even attempt to make your own mobile version the way I did. People can barely learn the GITHUB cli, nevermind creating a back end that acts like github and ensure no data loss / curruption. This is why I'm leaving access open.
- ✓The reason for this, I'm paying out for to host it and such. I don't mind, if you are uncomfortable deploying, that you use the provided mobile version. You just login via your github credentials, removing the need to create an account
- ✓The web version, went through a overhaul and be because I'm working from home, and never leaving, I have't had the change to extensively test, everything tested thus far is currently working.
The Complete Ecosystem
- ✓This isn't just another note-taking app. It's a complete productivity ecosystem that adapts to how you actually work:
- ✓- VSCode Extension - Seamlessly integrated into your development workflow
- ✓- Mobile App - Full-featured mobile experience with offline capabilities
- ✓- Web Access - Open any browser, access your GitHub repo, instant productivity
- ✓- GitHub Integration - Every note, todo, and reminder is version-controlled and shareable
- ✓- Team Collaboration - Real-time sync ensures everyone stays updated
- ✓- Offline Support - Keep working even without internet, sync when reconnected
Built for Real Workflows
- ✓Designed around the reality of modern development work
- ✓- you're not always at your desk
- ✓- you don't always have the same tools available
- ✓- and you often need to collaborate with others.
- ✓Whether you're a solo developer managing personal projects or part of a team shipping enterprise software, Task, Notes and Things scales to your needs without getting in your way.
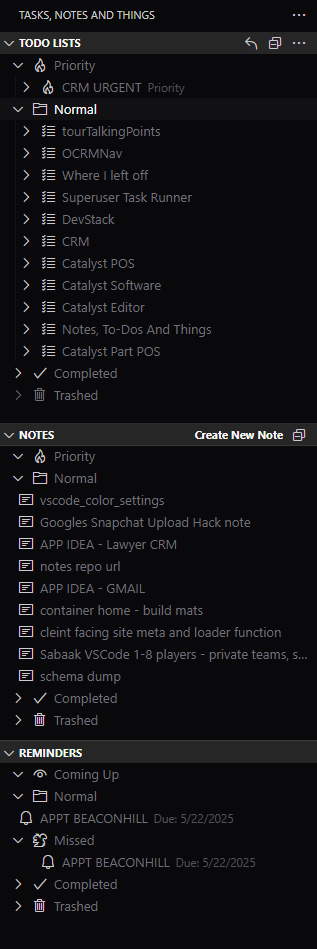
Configuration
File & Data Organization
- -Uses GitHub repositories as a single source of truth for both the VSCode extension and mobile version.
- -File Priorities
- -Priority - Important items that need attention
- -Normal - Standard everyday items
- -Completed - Archived finished items
- -Trash - Soft delete (like Windows recycle bin)
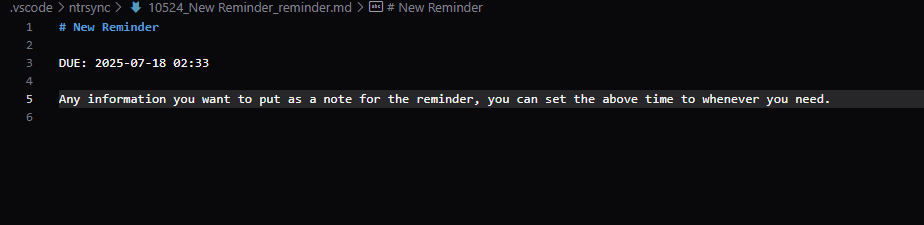
- -Coming Up - Reminders with scheduled notifications
- -Sync & Collaboration
- -Real-time sync - At runtime, syncs local items with GitHub repo to ensure you have the most up-to-date data
- -Public or private repos - Enables all of GitHub's features in correlation with this extension
- -Team collaboration - Whether you're a small team on a personal project or a development company, ensures fresh data is shared with the entire user base in real time
- -Web accessibility - Access your data wherever, whenever through the web version
- -User management - Add, edit, or remove user access easily
- -Easy sharing - If your notes contain important information, they're easily cloned or shared without hassle
VSCode Extension
- -Quick Actions
- -- Create files with buttons on their respective tabs within the navigator
- -- Lists each item by title for easy overview
- -Todo Lists
- -Navigator preview - View todo items in the navigator without opening files
- -One-click checking - Check or uncheck items easily in the navigator
- -Auto-sync - Whenever an item's checked state changes, it automatically syncs with GitHub
- -Click to edit - Click any item's title to open its file in the editor
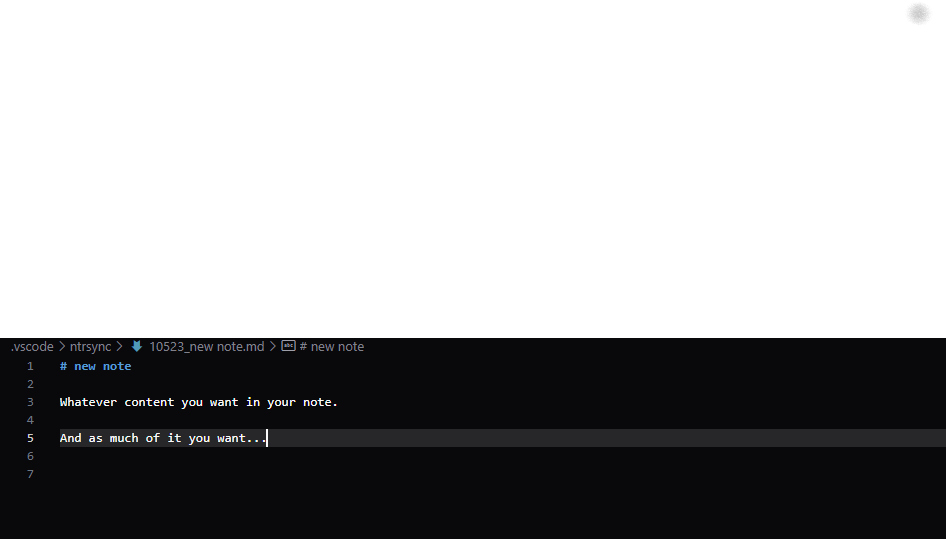
- -Editing Experience
- -Markdown editing - Edit in familiar .md files with all your usual tools
- -Auto-save sync - Changes automatically sync to your repo when you save
- -Reminder notifications - Toast notifications appear in VSCode when reminders are due
Mobile Version
- -Organization
- -- All files listed by title
- -- Reminders automatically organized by date
- -- Local data storage for offline access
- -Offline Support
- -Offline editing - Continue working without internet access
- -Smart sync - When connection is restored, syncs with GitHub to grab missing data
- -Push on reconnect - Uploads any data created/edited while offline
- -Viewing Modes
- -Title View
- -- Browse all files by title
- -- Select to open respective file
- -Check/Edit Mode *(Todo lists only)*
- -- Merges all todo lists and displays all items together
- -- More efficient workflow for reviewing all list items
- -- No need to open, review, close, repeat for each list
- -- Check items directly - updates line item and syncs with GitHub
- -Settings Dashboard
- -Full GitHub integration - Access all GitHub features from the settings
- -Repository management - Create new repos for new 'databases'
- -User management - Add or remove users from your current repo
- -Complete control - Everything achievable without visiting GitHub directly
git clone https://github.com/8an3/NTRSync-Mobile.gitFeatures
- ✓login via github credentials
- ✓each category of file type will have its own page to list items
- ✓create, edit delete items, and check off to do list items
- ✓upon connection resoration, sync with github, allowing access when offline
- ✓to do lists views
- ✓- displaying a list of to do lists by their title and priority
- ✓ - when a list is clicked, it will open that files to do list
- ✓- check mode
- ✓ - cannot edit any line items description
- ✓ - converts all to do lists, into one large uninteruppted list
- ✓ - each line item becomes a button, when clicked will changed the completed status
- ✓ - allowing the user view and edit line items, in a much easier, less time consuming fashion
- ✓ - when ever a line item changes, save the data to the relevant file and pushes to github
- ✓whenever a value, pushes to github, unless offline
- ✓when offline, saves locally in your browser, when back up, syncs dirty data
- ✓enabling zero downtime
Configuration
File & Data Organization
- -Uses GitHub repositories as a single source of truth for both the VSCode extension and mobile version.
- -File Priorities
- -- **Priority** - Important items that need attention
- -- **Normal** - Standard everyday items
- -- **Completed** - Archived finished items
- -- **Trash** - Soft delete (like Windows recycle bin)
- -- **Coming Up** - Reminders with scheduled notifications
- -Sync & Collaboration
- -- **Real-time sync** - At runtime, syncs local items with GitHub repo to ensure you have the most up-to-date data
- -- **Public or private repos** - Enables all of GitHub's features in correlation with this extension
- -- **Team collaboration** - Whether you're a small team on a personal project or a development company, ensures fresh data is shared with the entire user base in real time
- -- **Web accessibility** - Access your data wherever, whenever through the web version
- -- **User management** - Add, edit, or remove user access easily
- -- **Easy sharing** - If your notes contain important information, they're easily cloned or shared without hassle
Config Section
Share With Friends
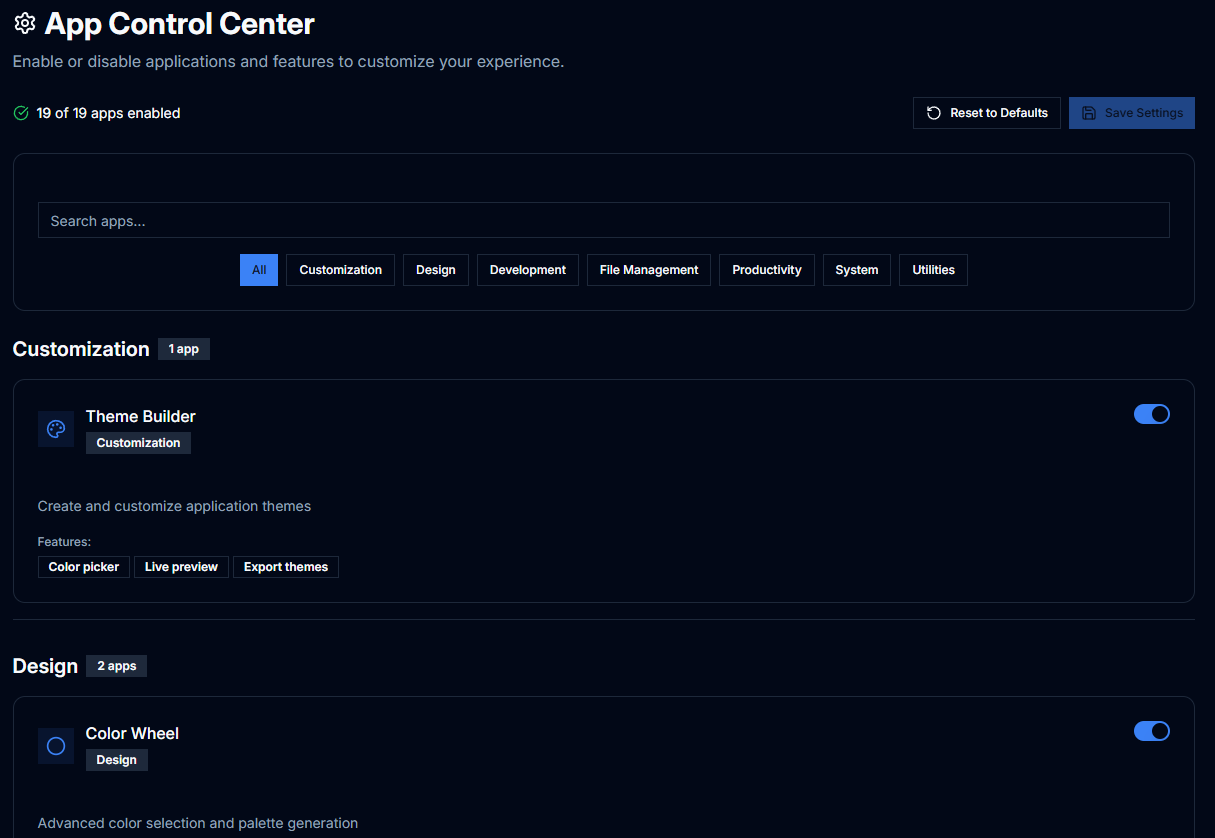
Default Apps Configuration
Features
- ✓Allows you to control which features you have access to.
- ✓Configuration is located in:
- ✓- The extension’s settings accessible through its marketplace listing.
- ✓- The config submenu via the title bar dropdown.
- ✓- The new UI coming soon.
View Config Example
Features
- ✓In UI
- ✓In the sidebar click example configs
// #dev
replicating // #region and // #endregion, but instead of messing with anything that you already in place this uses // #dev and // #enddev
Issue
- ✓Working with larger files often requires selective code folding on file open—a functionality not natively supported by VS Code. The challenge becomes particularly acute with complex files like package.json, where complete folding creates navigation difficulties, while no folding results in overwhelming content visibility.
- ✓After extensive attempts to achieve this functionality through existing VS Code features, a custom solution became necessary to address this common development workflow issue.
- ✓
Core Functionality
- ✓The Dev Region feature replicates VS Code's native `// #region` and `// #endregion` functionality while introducing enhanced behavior through custom `// #dev` and `// #enddev` markers.
- ✓Key Features:
- ✓- Intelligent Auto-Folding
- ✓ - **File Open Trigger**: Automatically folds all `#dev` regions when files are opened (not on file switching)
- ✓ - **Hierarchical Logic**: Parent regions remain open when containing child `#dev` regions, with only children folding
- ✓ - **Manual Override**: Extension title bar button provides on-demand folding for currently open files
- ✓- Native Integration
- ✓ - **VS Code Provider**: Custom folding provider ensures `#dev` regions display standard VS Code folding icons
- ✓ - **Consistent Behavior**: Dev regions function identically to native region markers in all interactions
- ✓- Supported Syntax Variations
- ✓ - The system recognizes multiple comment formats for maximum flexibility:
- ✓// #dev
- ✓//#dev
- ✓// #dev comment
- ✓//#dev comment
- ✓// #enddev
- ✓//#enddev
Package.json Solution
- ✓The JSON Comment Limitation
- ✓- Standard package.json files prohibit comments, and while JSONC (JSON with Comments) exists, it cannot be used for package.json files due to npm/Node.js compatibility requirements.:
- ✓- Workflow Implementation
- ✓- **Step 1: Script Configuration**
- ✓ - Add the following to your package.json scripts section:
- ✓ - "clean-package": "node scripts/build.js"
- ✓- **Step 2: Development File Creation**
- ✓ 1. Create `package.dev.jsonc` in your project root
- ✓ 2. Copy all content from package.json to package.dev.jsonc
- ✓ 3. Use package.dev.jsonc for all development work, leaving package.json untouched
- ✓- **Step 3: Build Script Implementation**
- ✓Create `scripts/build.js` with processing logic to transform package.dev.jsonc into clean package.json during build processes.
// scripts/build.js
const fs = require('fs');
const path = require('path');

try {
    const packageDevPath = path.join(__dirname, '..', 'package.dev.jsonc');
    const packageJsonPath = path.join(__dirname, '..', 'package.json');

  if (!fs.existsSync(packageDevPath)) {
        console.error('❌ package.dev.jsonc not found!');
        process.exit(1);
    }

    if (!fs.existsSync(packageJsonPath)) {
        console.error('❌ package.json not found!');
        process.exit(1);
    }

    // Step 1: Read current version from package.json
    console.log('📖 Reading current version from package.json...');
    const currentPackageJson = JSON.parse(fs.readFileSync(packageJsonPath, 'utf8'));
    const currentVersion = currentPackageJson.version;

    if (!currentVersion) {
        console.error('❌ No version found in package.json!');
        process.exit(1);
    }


    // Step 2: Update version in package.dev.jsonc
    console.log('📝 Updating version in package.dev.jsonc...');
    let devContent = fs.readFileSync(packageDevPath, 'utf8');

    // Replace version in package.dev.jsonc (handles both quoted formats)
    // This regex looks for "version": "any.version.here" and replaces the version part
    const versionRegex = /("version"s*:s*")([^"]+)(")/g;
    const updatedDevContent = devContent.replace(versionRegex, `$1${currentVersion}$3`);

    // Write updated package.dev.jsonc back
    fs.writeFileSync(packageDevPath, updatedDevContent, 'utf8');
    console.log('✅ Version updated in package.dev.jsonc');


    console.log('📖 Reading package.dev.jsonc...');
    const content = fs.readFileSync(packageDevPath, 'utf8');

    // Split into lines and filter out dev marker lines
    const lines = content.split('
');
    const cleanedLines = lines.filter(line => {
        const trimmed = line.trim();
        // Remove lines that contain dev markers with // comments (any spacing)
        return !(trimmed.includes('//') && trimmed.includes('#dev')) &&
               !(trimmed.includes('//') && trimmed.includes('#enddev'));
    });

    // Join back together
    let cleanJson = cleanedLines.join('
');

    // Remove trailing commas before closing brackets/braces (more thorough)
    cleanJson = cleanJson
        .replace(/,(s*
?
s*[}]])/g, '$1')  // Handle commas before newlines and closing braces/brackets
        .replace(/,(s*[}]])/g, '$1');         // Handle commas directly before closing braces/brackets

    console.log('🔍 Attempting to parse JSON...');

    try {
        const parsed = JSON.parse(cleanJson);
        console.log('✅ JSON validation passed');

        // Write the clean package.json
        fs.writeFileSync(packageJsonPath, cleanJson, 'utf8');
        console.log('✅ Successfully copied package.dev.jsonc → package.json');
        console.log('🧹 Removed //#dev and //#enddev lines');

    } catch (parseError) {
        console.error('❌ JSON Parse Error:', parseError.message);

        // Write debug file for inspection
        fs.writeFileSync(path.join(__dirname, '..', 'debug-output.json'), cleanJson, 'utf8');
        console.error('📝 Output written to debug-output.json for inspection');

        process.exit(1);
    }

} catch (error) {
    console.error('❌ Build script failed:', error.message);
    process.exit(1);
}
Advanced Use Cases
- ✓This solution extends beyond simple code organization:
- ✓- Complex Dependency Management
- ✓ - **Large Library Ecosystems**: Fold dependency groups for libraries with extensive addon collections
- ✓ - **Development vs Production**: Separate devDependencies and dependencies for cleaner file navigation
- ✓ - **Modular Configuration**: Organize complex configuration objects with logical folding boundaries
- ✓- File Organization Benefits
- ✓ - **Reduced Cognitive Load**: Hide non-essential sections during focused development
- ✓ - **Improved Navigation**: Maintain file structure visibility while reducing visual complexity
- ✓ - **Context Preservation**: Comments within dev regions provide additional context without cluttering the interface
- ✓Extension Development Workflow
- ✓- Automated Build and Publish Pipeline
- ✓ - For extension developers, the DevStack provides a comprehensive "Build Extension +++" command accessible via the DevStack Quick Pick in the status bar. This automated pipeline executes:
- ✓ - 1. **Save All Open Editors**: Ensures no unsaved changes are lost
- ✓ - 2. **Package.json Generation**: Builds clean package.json from package.dev.jsonc
- ✓ - 3. **Git Operations**: Commits and pushes current changes
- ✓ - 4. **Version Management**: Automatically upgrades patch version
- ✓ - 5. **Package Creation**: Generates VSCE package
- ✓ - 6. **Publication**: Publishes package via VSCE publish
- ✓ - 7. **Local Installation**: Automatically installs the newly built VSIX file
- ✓ - 8. **Extension Refresh**: Restarts extension host for immediate testing
- ✓ - Universal Package Management
- ✓ - Projects can utilize the script solely for package.json cleaning, providing a secondary folding solution that complements existing #region functionality. Both systems can coexist within the same file, offering comprehensive code organization options.
- ✓ - Custom Implementation
- ✓ - For developers preferring custom command integration, the core command `ocrmnavigator.yeet` can be incorporated into existing workflows: ( see below for section )
- ✓ - Technical Implementation Details
- ✓ - **Git Management**: The system intelligently handles repository state through conditional execution:
- ✓ - Clean repositories: `pnpm version patch && git push && git push --tags && vsce package`
- ✓ - Dirty repositories: `git add * && git diff --cached --quiet || git commit -m "Cleaning w/ push" && git push && pnpm version patch && git push && git push --tags && vsce package`
- ✓ - **Automated Installation**: Following successful publication, the system:
- ✓ - Scans the root directory for VSIX files
- ✓ - Monitors for new packages using a 5-minute timer with 20-second intervals
- ✓ - Automatically installs newly created packages
- ✓ - Executes extension refresh commands for immediate availability
- ✓ - **Performance Optimization**: The workflow concludes with:
- ✓ - `workbench.extensions.action.refreshExtension`
- ✓ - `workbench.action.restartExtensionHost`
- ✓ - These commands typically eliminate the need for full VS Code restarts, though complex changes may still require complete instance restarts.
Implementation Philosophy
- ✓The Dev Region feature represents a targeted solution to a specific workflow challenge rather than a comprehensive code organization system. By maintaining compatibility with existing VS Code functionality while adding intelligent auto-folding behavior, it provides enhanced productivity without disrupting established development patterns.
- ✓The implementation has exceeded expectations, particularly with large files. Testing on a 4,000-line file demonstrated exceptional organization capabilities—the file length actually exceeded the scroll map's display capacity, highlighting the system's effectiveness for managing extensive codebases.
Usage
Item
- -- // #dev
- -- //#dev
- -- // #dev commment
- -- //#dev commment
- -- // #enddev
- -- //#enddev
Left Off Note
A reusable single use note that is workdspace bound
Features
- ✓The Left Off Note feature provides a project-specific contextual note system designed to capture your development state when interrupting work sessions. This reusable, single-use note system creates bookmarks that preserve both your current location and mental context, enabling seamless re-engagement with projects after extended breaks.
- ✓- Access Method
- ✓ - Access the Left Off Note through **right-click** in the editor, which automatically captures the current file and line number for precise bookmark functionality.
- ✓- Core Purpose
- ✓ - This feature addresses the common challenge of context-switching in development work. Whether returning after a day, week, month, or switching between multiple projects, the Left Off Note preserves your exact working state and thought process, eliminating the time typically required to remember 'where you were' in the codebase.
- ✓- Content Types
- ✓- The system supports multiple content formats to accommodate different documentation needs:
- ✓ - Organizational Elements
- ✓ - **Checklists**: Task-oriented items with completion tracking
- ✓ - **Unordered Lists**: General bullet-point information
- ✓ - **Ordered Lists**: Sequential or prioritized items
- ✓ - Technical Documentationd
- ✓ - **Code Examples**: Syntax-highlighted code snippets for reference
- ✓ - **AI Prompt Responses**: Preserves AI-generated solutions and explanations (particularly valuable when sessions end unexpectedly before responses are saved)
- ✓ - Navigation and Context
- ✓ - **File Bookmarks**: Precise file and line number preservation for immediate return navigation
- ✓ - **File Uploads**: Single file attachment capability for relevant documentation
- ✓ - **Flexible Note Length**: Supports both brief reminders and comprehensive documentation
- ✓ - **Automatic Timestamping**: Records creation and last-modified dates for session tracking
- ✓ - Project-Specific Design
- ✓ - Unlike general-purpose task management systems, Left Off Notes are inherently project-specific. This constraint prevents feature bloat into generic todo list functionality while ensuring relevance and focused context preservation.
- ✓ - Intelligent Interface Design
- ✓ - Following extensive usage evaluation, the interface has been redesigned with advanced usability features:
- ✓ - **Auto-Resizing Text Areas**: All input fields dynamically adjust height based on content, eliminating manual resizing and optimizing screen real estate usage. This functionality will be incorporated into the UI library as 'TextareaV2' for broader implementation.
- ✓ - **Integrated Controls**: Action buttons are embedded within their respective text areas for streamlined interaction and reduced interface clutter.
- ✓ - **Progressive Disclosure**: Interface elements remain hidden until content is created, maintaining clean visual hierarchy and preventing overwhelming empty form fields.
- ✓ - Automated Content Management
- ✓ - **Smart Line Item Creation**: Pressing Enter in list-type fields automatically generates subsequent line items, eliminating repetitive button clicks for multi-item content:
- ✓ - List items (all types)
- ✓ - AI prompt sections
- ✓ - Code examples
- ✓ - **Contextual Sidebar**: A dedicated right-hand sidebar displays non-editable project metadata:
- ✓ - Project context and name
- ✓ - File information and path
- ✓ - Triggering line number for bookmark accuracy
- ✓ - Save timestamps for session tracking
- ✓- Technical Implementation
- ✓ - The bookmark system captures precise file locations, enabling direct navigation to the exact line where development was paused. This granular positioning, combined with comprehensive context documentation, creates a seamless development continuation experience.
Configuration
File Management
- -item
- -item
- -item
- -item
[
  {
    "label": "add",
    "path": "git add .",
    "type": "powershellCommand"
  },
  {
    "label": "commit",
    "path": "git commit -m 'message'",
    "type": "powershellCommand"
  },
  {
    "label": "push",
    "path": "git push",
    "type": "powershellCommand"
  }
]
Usage
Item
- -item
- -item
- -item
- -item
NOTE
Have already been using this idea for a while, but in the form of a note. Being what it is, it creates a couple of issue. Unless I create a list of them, which I dont want, at that point they just become your everyday to do list practically. Which this isn't trying to be that, and it being project specfic meets that requirement and allows one for each project
Shortcuts
I don't know why I didn't start this earlier, but while Im here...
Features
- ✓- Just so it doesn't compete with any familiar short cuts that are already in place. Instead of ctrl, alt will be used in its place
- ✓- side note, instead of having to come back here when you first start to use them, refer to the bookmarks quickpic, located in the status bar on the left
Usage
- ✓To avoid conflicts with existing VS Code keyboard shortcuts and maintain consistency across the extension, all custom shortcuts utilize the `Alt` key modifier instead of the conventional `Ctrl` key. This design decision ensures seamless integration with your existing workflow while providing quick access to extension functionality.
- ✓- Quick Reference
- ✓ - For immediate access to all keyboard shortcuts without returning to this documentation, reference the **Bookmarks Quick Pick** located in the status bar on the left side of your VS Code interface.
- ✓- Available Shortcuts
- ✓ - Core Functionality
- ✓ - **Task, Notes and Things Quick Pick**: `Alt + Shift + T`
- ✓ - *Note: This functionality is technically housed in a separate extension due to original architectural limitations regarding dual explorer pane implementation. Integration is planned for future releases but currently sidelined pending UI dashboard stability improvements.*
- ✓ - **Context Snippets**: `Alt + Shift + S`
- ✓ - **Clipboard++ History**: `Alt + Shift + C`
- ✓ - **Show Bookmarks**: `Alt + Shift + B`
- ✓ - **DevStack Quick Pick**: `Alt + Shift + D`
- ✓ - Dashboard and Interface
- ✓ - **Open UI Dashboard**: `Alt + Shift + A`
- ✓ - *Note: The 'A' assignment may seem arbitrary, but 'D' was already allocated and 'U' requires two-handed operation, compromising accessibility.*
- ✓ - Experimental Features
- ✓ - **⚠️ Testing Phase**: The following shortcuts access experimental functionality currently under evaluation. These features may not perform as expected and are excluded from the bookmarks reference system.
- ✓ - **Errors Plus**: `Alt + Shift + E`
- ✓ - **Show Error History**: `Alt + Shift + H`
- ✓- Implementation Notes
- ✓ - The shortcut system represents a balance between functionality and usability. All shortcuts are designed for single-handed operation where possible, and the consistent `Alt + Shift` prefix creates muscle memory while maintaining clear separation from native VS Code commands.
- ✓- Documentation Reference
- ✓ - For comprehensive details on each shortcut's functionality, visit the [complete documentation](https://catalyst-software.vercel.app/DevStack#Shortcuts).
Create Export Index ( Simple Registry )
Features
- ✓A streamlined solution for creating barrel exports that automatically generates index files with recursive export statements to simplify import management across complex project structures.
- ✓- Functionality
- ✓ - **Right-click Context Menu**: Access via right-click on any folder within the file explorer
- ✓ - **Automatic Index Creation**: Generates an index.ts/index.js file directly within the selected folder
- ✓ - **Recursive Export Mapping**: Automatically scans and exports all files within the target folder using export * syntax
- ✓ - **Import Statement Optimization**: Consolidates multiple file imports into clean, single-line import statements
- ✓- Performance Benefits
- ✓ - **Reliability**: Consistent execution without VS Code crashes or unexpected behavior
- ✓ - **Accuracy**: Creates index files in the correct location with properly formatted exports
- ✓ - **Speed**: Near-instantaneous generation regardless of folder size or complexity
- ✓ - **Stability**: Maintains VS Code performance during operation
- ✓- Real-World Application
- ✓ - **UI Library Integration**: Specifically designed to work seamlessly with component libraries containing extensive collections
- ✓ - **Large-Scale Projects**: Handles directories with numerous files and nested structures efficiently
- ✓ - **Development Workflow**: Eliminates manual barrel export creation and maintenance
- ✓- Competitive Advantage
- ✓ - Unlike similar extensions that frequently crash VS Code, create files in incorrect locations, or generate malformed export statements, this implementation provides consistent, reliable functionality
- ✓ - Extensive real-world testing confirms superior performance compared to existing solutions
- ✓ - Zero configuration required - works immediately upon installation
- ✓- Use Cases
- ✓ - **Component Libraries**: Perfect for organizing large collections of React components, Vue components, or similar modular code
- ✓ - **Utility Functions**: Streamlines exports for helper function directories
- ✓ - **API Endpoints**: Simplifies route organization in backend projects
- ✓ - **Type Definitions**: Consolidates TypeScript type exports across multiple files
Errors And Imports
Find Errors and Missing Imports
- ✓**⚠️ Experimental Feature**: This functionality is currently in testing phase and may not perform as expected. Documentation is provided for reference, though the feature may be removed if testing results are unsatisfactory.
- ✓This feature provides intelligent error detection and automated resolution capabilities without employing resource-intensive background processes. Unlike similar extensions that continuously monitor your development environment, this tool operates exclusively on-demand, ensuring optimal VS Code performance.
- ✓- Performance Philosophy
- ✓ - The design prioritizes system efficiency by requiring manual activation for all operations. This approach prevents the performance degradation commonly associated with similar automated error-checking extensions, maintaining your development environment's responsiveness.
- ✓- Access Methods
- ✓ - Primary Access
- ✓ - **Right-click** in the editor and select **'Find Errors, Missing Imports & More'**
- ✓ - **Keyboard Shortcut**: `Alt + Shift + E`
- ✓ - Error History
- ✓ - **Quick Pick Menu**: Located in the bottom-left status bar, displays error message history
- ✓ - **Keyboard Shortcut**: `Alt + Shift + H`
- ✓- Automated Resolution Workflow
- ✓ - When an error is selected, the system executes a comprehensive resolution sequence:
- ✓ - **Native VS Code Resolution**: Attempts automatic error correction using VS Code's built-in diagnostic engine
- ✓ - **Copilot Integration**: Triggers autocomplete suggestions if native resolution fails
- ✓ - **Interactive Chat**: Opens Copilot Chat (when available) with contextual error information
- ✓ - **Intelligent Prompting**: Automatically sends error message and relevant code as a structured prompt
- ✓ - Initially provides 5-10 surrounding lines of context
- ✓ - Offers to expand to the complete affected function if initial context proves insufficient
- ✓ - **Fallback Options**:
- ✓ - Attempts to open chat sidebar if direct chat fails
- ✓ - Sends interactive editor message to Copilot as final resolution attempt
- ✓- Advanced Features
- ✓ - Version Control
- ✓ - **State Management**: Maintains the last 5 successful fixes in memory
- ✓ - **Rollback Capability**: Enables quick reversal of multiple consecutive changes
- ✓ - Cross-File Dependencies
- ✓ - **Native Engine Integration**: Leverages VS Code's built-in dependency resolution system for import management
- ✓- Experimental Learning System
- ✓ - **Note**: This represents an experimental approach with uncertain outcomes. The feature may be discontinued based on performance evaluation.
- ✓ - Adaptive Pattern Recognition
- ✓ - **Local Storage**: Records successful fix patterns with associated error contexts
- ✓ - **Incremental Learning**: Builds knowledge base over time through usage patterns
- ✓ - **Memory Efficiency**: Designed to maintain minimal memory footprint; feature will be removed if resource consumption becomes excessive
- ✓ - Enhanced AI Interaction
- ✓ - **Contextual Prompting**: Provides Copilot with previously successful solutions for similar errors
- ✓ - **Quality Improvement**: Aims to increase AI response accuracy and fix success rates through pattern matching
- ✓- Development Philosophy
- ✓ - This feature represents an experimental approach to AI-assisted error resolution. Rather than requiring extensive manual prompt engineering for each error, the system attempts to build contextual understanding over time. The goal is to create a tool that enhances productivity without the time investment typically required for effective AI collaboration.
- ✓ - Success measurement focuses on practical utility—the feature must demonstrably reduce debugging time while maintaining code quality. If these objectives cannot be achieved, the experimental nature allows for feature removal without impacting core extension functionality.
Config Reference Sheet
Config Reference Sheet
[
  {
    "label": "APPS_AND_PROJS",
    "expanded": false,
    "type": "folder",
    "global": true,
    "items": [
      {
        "label": "CRM",
        "path": "code-insiders -n f:/OpinionatedCRM",
        "type": "powershellCommand"
      },
      {
        "label": "Catalyst Software",
        "path": "code-insiders -n f:/Catalyst-Software",
        "type": "powershellCommand"
      },
      {
        "label": "CatalystPOS",
        "path": "code-insiders -n f:/CatalystPOS",
        "type": "powershellCommand"
      },
      {
        "label": "VLC w/ playlist",
        "path": "cd /mnt/f/music && '/mnt/c/Program Files/VideoLAN/VLC/vlc.exe' 1Firreee.xspf",
        "type": "debianCMD"
      }
    ]
  }
][
{
"label": "add",
"path": "git add .",
"type": "powershellCommand"
},
{
"label": "commit",
"path": "git commit -m 'message'",
"type": "powershellCommand"
},
{
"label": "push",
"path": "git push",
"type": "powershellCommand"
}
]{
"label": "Auto Push",
"path": "add, commit, push",
"type": "chain"
}[
{
"label": "add",
"path": "git add .",
"type": "powershellCommand"
},
{
"label": "commit",
"path": "git commit -m 'message'",
"type": "powershellCommand"
},
{
"label": "push",
"path": "git push",
"type": "powershellCommand"
}
][
{
"nuclear:all": {
"sequential": true,
"tasks": [
"clean:all",
"i:all",
"build:all",
"build:prod",
"db:all",
"db:prod",
"patch:all",
"dev:all"
]
}
}
][
{
"push:app": {
"directory": "apps/app",
"command": "git add * && git commit -m \"Cleaning w/ push\" && git push"
}
}
][
{
"dev:all": {
"tasks": [
"dev:app",
"dev:calendar",
"dev:pdf",
"dev:server",
"dev:api",
"dev:publicSite",
"dev:adminPortal",
"dev:userPortal",
"dev:headOfficePortal"
]
}
}
]{
"label": "CRM",
"path": "code-insiders -n f:/workspace",
"type": "powershellCommand"
}{
"label": "CRM",
"path": "code-insiders -n f:/workspace",
"type": "powershellCommand"
}{
"label": "PGAdmin",
"path": "& \"c:/Program Files/PostgreSQL/16/pgAdmin 4/runtime/pgAdmin4.exe\"",
"type": "powershellCommand"
}{
"label": "toggle terminal",
"path": "workbench.action.terminal.toggleTerminal",
"type": "command"
}{
"label": "admin dash",
"path": "apps/app/app/routes/adminDash.tsx",
"type": "file"
}{
"label": "appIdeas.lawyerApp",
"path": ".vscode//ocrmnavigator//.md//appIdeas.lawyerApp.md",
"type": "file"
}{
"label": "8an3/OpinionatedDealerCRM",
"path": "https://github.com/8an3/OpinionatedDealerCRM",
"type": "url"
}{
"label": "shad accordian",
"path": ".vscode/ocrmnavigator/ocrmnavigator.code-snippets",
"type": "snippet"
}{
"label": "VLC w/ playlist",
"path": "cd /mnt/f/music && '/mnt/c/Program Files/VideoLAN/VLC/vlc.exe' 1Firreee.xspf",
"type": "debianCMD"
}Debian bash cmds
if you actually want to open a playlist in vlc, you have to follow this to the tee. You need to cd into the folder where your playlist is, then call vlc from the debian containered path, finally give the playlist as a single argument. I dont know why... but it doesn't work any other way. Their docs haven't been updated since xp... so... ya...
[
  {
    "label": "Commit And Push Current Proj",
    "path": "saveall, commitpush",
    "type": "chain"
  },
  {
    "label": "Save All and Upgrade Patch",
    "path": "saveall, plusversion",
    "type": "chain"
  },
  {
    "label": "saveall",
    "path": "workbench.action.files.saveAll",
    "type": "command",
    "hidden": true
  },
  {
    "label": "plusversion",
    "path": "git add * && git commit -m \"Cleaning w/ push\" && git push && pnpm version patch && git push && git push --tags",
    "type": "powershellCommand",
    "hidden": true
  },
  {
    "label": "commitpush",
    "path": "git add . && git commit -m \"Cleaning w/ push\" && git push",
    "type": "powershellCommand",
    "hidden": true
  }
]
Development
New Features
- ✓Items placed here are awaiting for their own sections to be made and included among the others, or is currently in developement / testing:
- ✓folding regions update
- ✓- fixed #dev folding regions as well as adding support for other file types, below is the current list it now supports
- ✓- css
- ✓ - `/* #dev */`
- ✓ - `/* #enddev */`
- ✓- md
- ✓ - `<!-- #dev -->`
- ✓ - `<!-- #enddev -->`
- ✓- js, ts, jsx, tsx
- ✓ - `//#dev`, `// #dev`, `/* #dev */`
- ✓ - `//#enddev`, `// #enddev`, `/* #enddev */`
- ✓- html
- ✓ - `<!-- #dev -->`
- ✓ - `<!-- #enddev -->`
- ✓- csharp
- ✓ - `//#dev`, `// #dev`, `/* #dev */`
- ✓ - `//#enddev`, `// #enddev`, `/* #enddev */`
- ✓- copyValue needs to be added to web app
- ✓- Blue Out, variant of blacked out has been added
- ✓Find Errors, Missing Imports & More
- ✓See Readme
Future Dev
- ✓snippets viewer - would be awesome to redo it but with a command on the left to search through them more easily, paired with a monaco editor, so you can read and edit on the fly
- ✓It seems to be happening with increasing frequency, where bookmarked resources are getting deleted at the source. Should create something to house them. cant just place them within the ui library, but need to figure something out because it takes too long to either look for it again or try to figure it out on your own. note: reason for even thinking of this, need to find that weird command sequence to find and place cursor on highlighted lines with in the editor, like a json file or an array, allowing you to edit 10,000 items at once. Either way start working on building the data for it atleast, thats really annoying... becuase theres no way im editing that file line by line, when it would take less than 5 secs with that one stupid sequence
- ✓Visualize schema object, start from scratch and build it on the browser side
- ✓- different idea on completing, but also expaneded on it
- ✓ - within the web app, build a schema wizard. For me atleast, I find that as the schema / project continues to build and expanded on I'm constantly jumping back and forth, from object to object, grabing the value to link to another object, then going back ensuring everything was done right, then triple checking. All the while, your bouncing down 450 lines, then back up 450, then down 550, shit went to far... searching for it again, saying under my breath, where the fuck did it just go... lol.
- ✓ - logically, at face value it doesn't seem to be worth building this, but how many times has that happened to you? I dont even want to know the answer of exactly how much time I have wasted in that file for one reason or another. That's just one time wasting example, while I can think of others, where if I was working it in a ui instead, wouldn't be a issue to start while at the same time, coding in features and functions that would save time
- ✓ - this being one of those ideas, where its either stupid, crazy or amazing, where you only find out after building and testing it...
- ✓ - whenever working with an object, have a + relation button, when clicked opens a command to search and select a object to link to
- ✓ - being able to insert pre built objects, that would actually save a lot of time on some bigger ones, because when I think about it, from the view point, if I were to insert a pre built object, how much would I then have to change to make it work? schemas don't change all that much from app to app, really, unless your adding something different
- ✓ - with nice, thought-out and planned ui, would make it so easy to work with, like having a command on the left to search for or select the object to edit, this object should be linked, so editing the user object needing to add that relation, technically, you can remove half that processes work laod. Steps to complete would be: 1) select user object, 2) click add relation, and select review object
- ✓ - no more organizng values, to ensure each object can still be reviewed witrh ease, even with that object having 50+ values
- ✓ - this will be built... I just can't right now. As you would have guessed, the amount of time and work that is needed for such stupid extensions / projects, not including, my real paid work that I need to do. But I find lately, they are taking more of my focus away from them. I need to start asking myself, will spending the time on this page, be worth it in the end? I've spent almost, a day and a half now on the components viewer, again for the 10th time. Perfecting it, to a rediculous amount of granularity. BUT, I spend a lot of time there, as you will to. Being built, honestly ass backwords when comparing to every other single library. But it has so many issues in its current state on those libraries, that bother me so much since it is used SO often. Even before this current update, using it made me never want to visit another library ever again. This update will probably even make me delete all my bookmarks for them. I really do not understand, as a dev if you also use the resource you built, just sit there and seeing something that can be built better, because cmon, theres no way you don't notice them... and just say, meh it works, and shrug it off
- ✓convert remix stack to react-router
NOTE
Don’t be afraid to send ideas — as you can tell, I’m not shy about including anything if it’s smart or useful. That said, if your idea relies on background processes running frequently to work, feel free to send it, but don’t expect it to be implemented. The goal is to avoid bogging down VSCode in any way
If I think your idea is truly awesome and the performance trade-off is worth it, I’ll include it
Long story short: the platform they chose to build VSCode uses way more resources than it could have. Combine that with poorly built extensions that constantly eat resources, and you get the performance issues people complain about. That’s why I’m 99% sure I won’t include anything that runs in the background or needs to run frequently / constantly
Speaking of performance — if you're working in a large project and notice a hit to performance, I’ll include a JSON code snippet with settings you can tweak to get a LOT of that performance back
Tips
{
  "files.watcherExclude": {
    "**/.git/**": true,
    "**/node_modules/**": true,
    "**/dist/**": true,
    "**/build/**": true,
    "**/public/**": true,
    "**/.cache/**": true,
    "**/false/**": true,
    "**/*": true
  },
  "javascript.validate.enable": false,
  "typescript.validate.enable": false,
  "search.followSymlinks": false,
  "git.enabled": false,
  "git.autorefresh": false,
  "git.allowForcePush": false,
  "search.useIgnoreFiles": false,
  "search.quickOpen.includeSymbols": false,
  "editor.quickSuggestions": {
    "other": false,
    "comments": false,
    "strings": false
  },
  "git.decorations.enabled": false,
  "scm.diffDecorations": "none",
  "security.workspace.trust.enabled": false
}
After saving these values, work backwards — start by removing this one from the list... // Remove **/*: true to re-enable watching for other files
That setting is obviously aggressive — but hey, maybe it fits your use case. It’s a slow process, I know (I’ve done it), but go through each setting one at a time. These values basically disable almost everything in vscode with a background process. Personally, I couldn’t care less about GitHub syncs — I turned that off. But I know some people can't live without it. Same goes for the others. If I remember right, there was only one I didn't want to disable. But the performance boost when setting all of these to false? Fucking massive.
In my largest project, I have every one of these set to false — including Git and diff decorations. I'll include those settings too. Before: constant CPU spikes, 10–15 seconds of full-throttle lag, sometimes nonstop. After: smooth sailing. My system hasn’t even touched 50% usage since. I haven’t had to revisit these settings at all, but you might find even more tweaks.
If you're still seeing issues after this, try figuring out what’s always or frequently running in the background — and kill it. For example, GitHub querying your repo and scanning for local changes can eat up way more than it should.
Issues
- ✓- Monaco MD Editor
- ✓ - Currently, list indentation is NOT formatting correctly in the renderer. Built using a custom renderer, at the time I wanted / needed to create a renderer to use on this platform due to having compatibility issues with ssr. After not being able to locate a solution, that wasn't a headache in itself to install and or use, deciding to create one myself. Having used renderes, across many platforms, in several different enviroments and scenarios, its been annoying that I have not been able to find a library, that solves this stupid issue. So platform agnostic, along with giving 0 headaches whether it was used with ssr or, easy / painless install, among a couple of other ideas that are non-critical, for example if you need to change the styling of the renderered content, it was made in a way that this could be done with VERY little experience. Do you know how to use tailwind? Great, your are qualified, to go nuts and hack away at the styles. Anyways, I had decided to build from scratch. It was a success, it works great, easier to install... than literally any other renderer library, and can be used literally, anywhere in any project because it does NOT have any dependencies, server side or client side, implementing is a breeze. I haven't had the time to look at why its not indenting. Thinking on it, to be honest, I probably forgot to code it in. When I have some time, I will remedy it, but for now the rendered content will not indent. To note: structure your md content, with indenting your lists, like you normally would, because your content WILL not get effected in any way, since it does not edit the content itself. That way, whenever it does get fixed, there is zero action on your part that is needed.
- ✓Editor URL: /extension/monacoEditor
NOTE
If you see an issue, let me know. I’m the only one working on this, and honestly, the feature list is getting ridiculous. ( Its more absurdly, ludicrous extension idea / offering. Please do not... go off and try to build something similar. Please view, 'Absurdly, Ludicrous', in the 'About' section to read more. )
If something breaks because of a new feature I added and I didn’t catch it—give me some time and I will get to it.
Demo
Quick demo on youtubeWell, its not quick in length, but I try to go over everything quickly.
About
DevStack began as a personal productivity experiment - a collection of development tools I built to streamline my own workflow. What started as a hastily named project with zero marketing consideration has unexpectedly grown into something that resonates with developers worldwide. Features were only added when, I got too frustrated with the extension crashing, poorly designed ui, terrible application design, design choices that were horrible for the end-user, and more. A lot of the time, I just wanted to see if I could implement it and have it run smoother / faster.
The original name "OCRMNav" was admittedly terrible - a placeholder that stuck around far longer than it should have. I never added proper keywords, categories, or even a decent description. Yet somehow, this extension has found its way to thousands of developers who saw the same potential I did: the need for a comprehensive, all-in-one development toolkit.
The Evolution
When developers started reaching out with feature requests and feedback, I realized this wasn't just my personal tool anymore - it had become something the community wanted and needed. That's when I decided to rebrand to "DevStack" and give this project the attention it deserved.
Why It Worked (Despite Everything)
Sometimes the best solutions come from solving your own problems. DevStack succeeds because it addresses real developer pain points:
Moving Forward
Today, DevStack is a proper extension with clear documentation, thoughtful features, and a roadmap driven by community feedback. While I'm amazed anyone discovered it in its original state, I'm grateful for every developer who took a chance on a poorly named extension and helped shape it into what it is today. With everything above in consideration, I'm stunned anyone even found the project in its previous state, and after seeing horrible documentation due to only writing it for myself ( some things were even written as if I was talking to myself, haha ) and then shockingly still installing it. Makes no sense, unless the data in the dashboard is unhinged, which I don't see that being the case ( ... how did it even come up in searchs? )
Absurdly, Ludicrous
Someone recently asked me, 'Should I build my own version of DevStack?'... Honestly, no. Absolutely not.
I get why they thought it was a good idea. They liked the utility and the wide range of topics it covers, thinking it would be a great way to learn how to build tools for VSCode. But even from a pure learning standpoint, it's just not a good path to go down.
I'm writing this because if one person had this idea, I know others will too. Hopefully, this stops them before they waste their time.
Why do I say this? Even though it's turned out to be a fantastic solution that saves me a ton of time while coding, and solves so many annoying problems—whether they're small, large, or just due to lazy development in other extensions.
Here's why you shouldn't try to build your own:
The sheer size of this thing is hard to wrap your head around. We're talking about menus, functions, and the final extension size—it got so big that the packaging tool itself warned me it was too large, which is just crazy. It deals with unique problems no other extension has faced, and I've had to become insanely organized to keep track of everything. We're at over 3500 functions, and it's easy to get lost. I wouldn't be surprised if it hits 5000.
The code is spread across two projects—the main extension and a companion web app—in a way I haven't really seen before. I started with webviews inside VSCode, but it was one headache after another. I finally reached a breaking point and looked for a better way. I ended up building a separate web app to work with the extension, and all my problems vanished. I have total freedom now, with access to all modern web libraries and none of VSCode's limitations.
As a learning project, it would be a nightmare. You'd be coding with no guidance, no idea how to make it work, or even where to start. I still consider myself a pretty new developer, but I learned to code in a really rough way that gave me a unique perspective. Without that experience, I would never tell someone at my starting level to take on a blind task like this.
Here's the most important reason: this extension was built for my personal use, and that's it. The only reason I put in the work to make it public—like writing a readme or documentation—was because I needed a way to install it easily on any machine. I made it as hard to find as possible on the marketplace. No descriptions, no tags, nothing. Then one day, I accidentally saw it had hundreds of installs. I was shocked. I still don't know how people found it. I felt bad that people were using something with zero instructions, so I dropped everything to fix it.
The crazy part is that this whole project was never planned. There was no roadmap. Everything that's been added was because I had a problem with another extension. The bar for adding something new kept getting lower until it was gone. Now, if an extension annoys me even a little, I uninstall it and build its features into DevStack.
I used to hit a wall if I had more than 14 extensions installed; VSCode would just freeze. The common advice across the entire industry is to just uninstall extensions. So how is it that DevStack, which replaces over a hundred extensions, runs smoothly? It doesn't make sense, but it does.
Since this is for my own use, I'll constantly rebuild parts of it to save every second I can. When you use something thousands of times a year, saving 20 seconds each time adds up. Doing that for over a hundred different tools is a colossal task that even teams of developers don't take on.
I could list more reasons, but hopefully, this is enough. My advice? Don't go looking for problems you don't have. If you want to learn, pick one extension that gives you the most headaches and try to build a better version. Start small. Make sure whatever you build is better in every way. Learning is a journey, and those small improvements are the steps you need to take.
To finish my earlier point: taking on a huge project with no guidance is a bad way to learn. If you don't know what you're doing, you can get stuck for the dumbest reasons. You might not even be able to find the right answers online. I know because I lived it.
I'm self-taught. No university, no classes, no mentors. When I started, I picked a newer development platform, and it was a huge mistake. The documentation was written for experts, and it felt like they changed everything every few months. Most blog posts about it were outdated within 60 days. Every day felt like smashing my head against a brick wall. If anyone asked me for guidance, I'd tell them to do the exact opposite of everything I did.
Not many people would have stuck with it. I only did because of a drive I built up over years in sales. But that experience gave me one big advantage: I look at problems differently. I believe that with code, any problem has a solution—you just have to write it. You might not have the answer yet, but it's out there. I've solved industry-wide problems that big companies are spending millions on, sometimes with just a simple, opposite approach to what everyone else is doing. All because I think if there's a problem, the code can fix it. You just have to be willing to bang your head against the wall until you break through.
Note For Any Included Libraries
Any libraries that were included in this extension ie: lucide icons, ShadnCN, tailwind etc. I did not create or had anything to do with the development of these libraries.
Their implementation in this extension is nothing but an extension of that library and its data. Just allowing / improving access to that libraries information within vscode for the end user and none of that libraries information was edited or left out for any purpose.
If you want to say thanks or give them feedback in regards to these libraries, contact them. If you have any comments about how the information is being presented to you within vscode, then contact me. For example, I did not make any of the icons for lucide, don't contact me for an idea about creating an icon. With saying that, if all the icons that are displayed, in vscode when you use this feature, are presenting one image across the 1000 or so buttons to click, then that's my dept, don't contact them, they will have no idea what your talking about. Thought to mention this because someone did contact me about a new icon and I wouldn't want you to waste your time.